User Guide
Introduction
JeeqTracker is a desktop application created for home-based business owners. It helps you keep track of your clients’ contact details, transaction records, and remarks about the client.
If this is your first time using our User Guide, you might want to read this section on how to use this User Guide
Table of Contents
- About JeeqTracker
- Quick Start
- User Interface Overview
- How to use the User Guide
- Features
- FAQ
- Command Summary
- Prefix Summary
About JeeqTracker
JeeqTracker is an extremely simple and easy-to-use application that will help you to keep track of your clients’ contact details, transaction records, and remarks about the client.
Due to the nature of a home-based business, you will probably be thinking of how you can keep your clients engaged and increase customers satisfaction. With JeeqTracker, you can analyze and understand the demands of each client and provide a more personalized service that would meet the needs of your client, increasing customer engagement.
Quick start
-
Ensure you have Java 11 installed in your Computer. If you do not have Java, you can download it from here for Window Users and here for Mac Users.
-
Download the latest jeeqtracker.jar from here.
-
Copy the file to the folder you want to use as the home folder for your JeeqTracker.
-
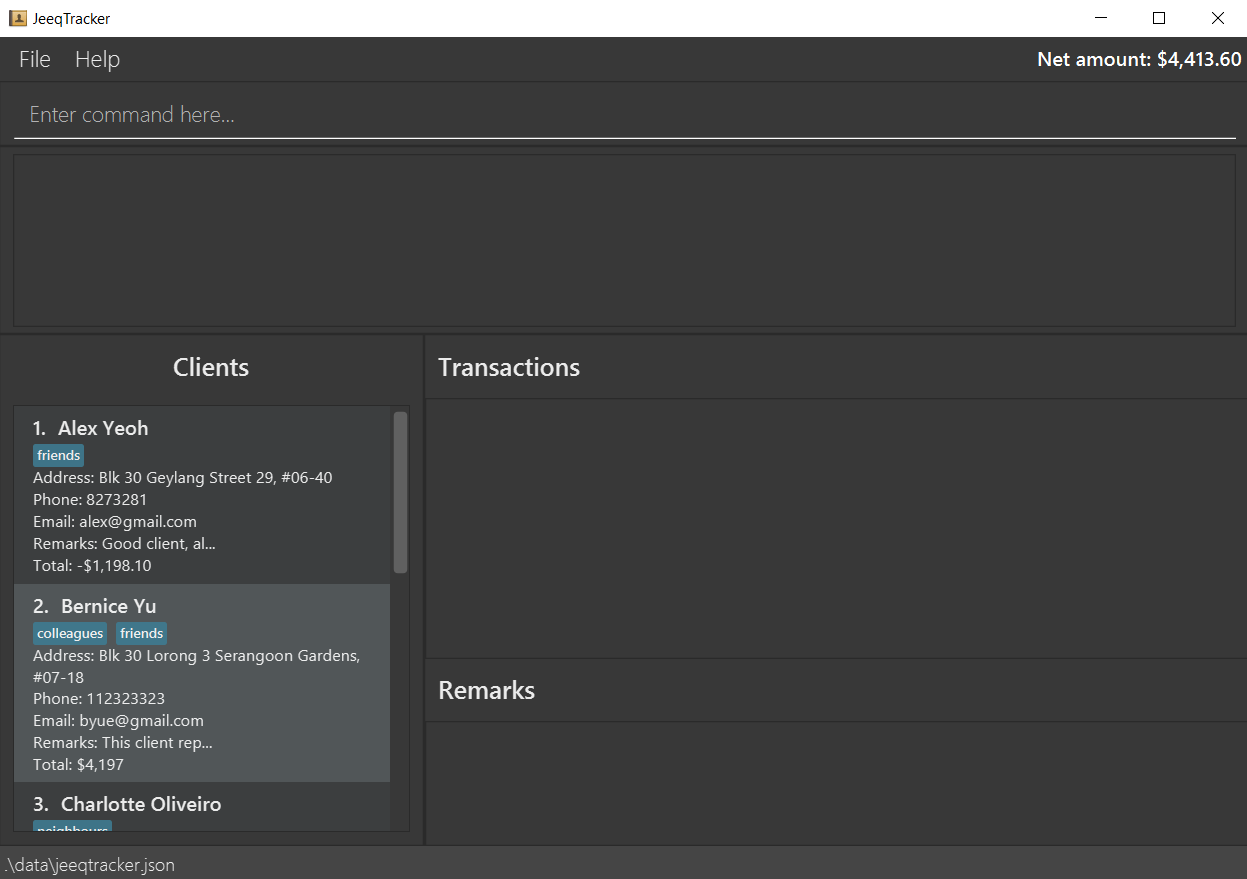
Double-click the file to start the app. The GUI similar to the below should appear in a few seconds. Note how the application contains some sample data.
-
Type the command in the command box and press Enter to execute it.
e.g. typinghelpand pressing Enter will show the list of commands.Some example commands you can try:
-
list: Lists all clients. -
addn/Alice a/311 Clementi Ave 2 p/9191919 e/alice@gmail.com t/friends: Adds a client named Alice into JeeqTracker. -
delete1 m/client: Deletes the client at the first index together with all their transactions and remarks in the current list. -
findBernice: Finds Bernice from the list of clients and display all clients with name containing Bernice. If there is only one find result, you will be able to see the transactions and remarks of Bernice as well. -
view2: Views the second client in the list and shows your transactions and remarks with him. -
exit: Exits the app.
-
-
Refer to the Features below for details of each command.
User Interface Overview
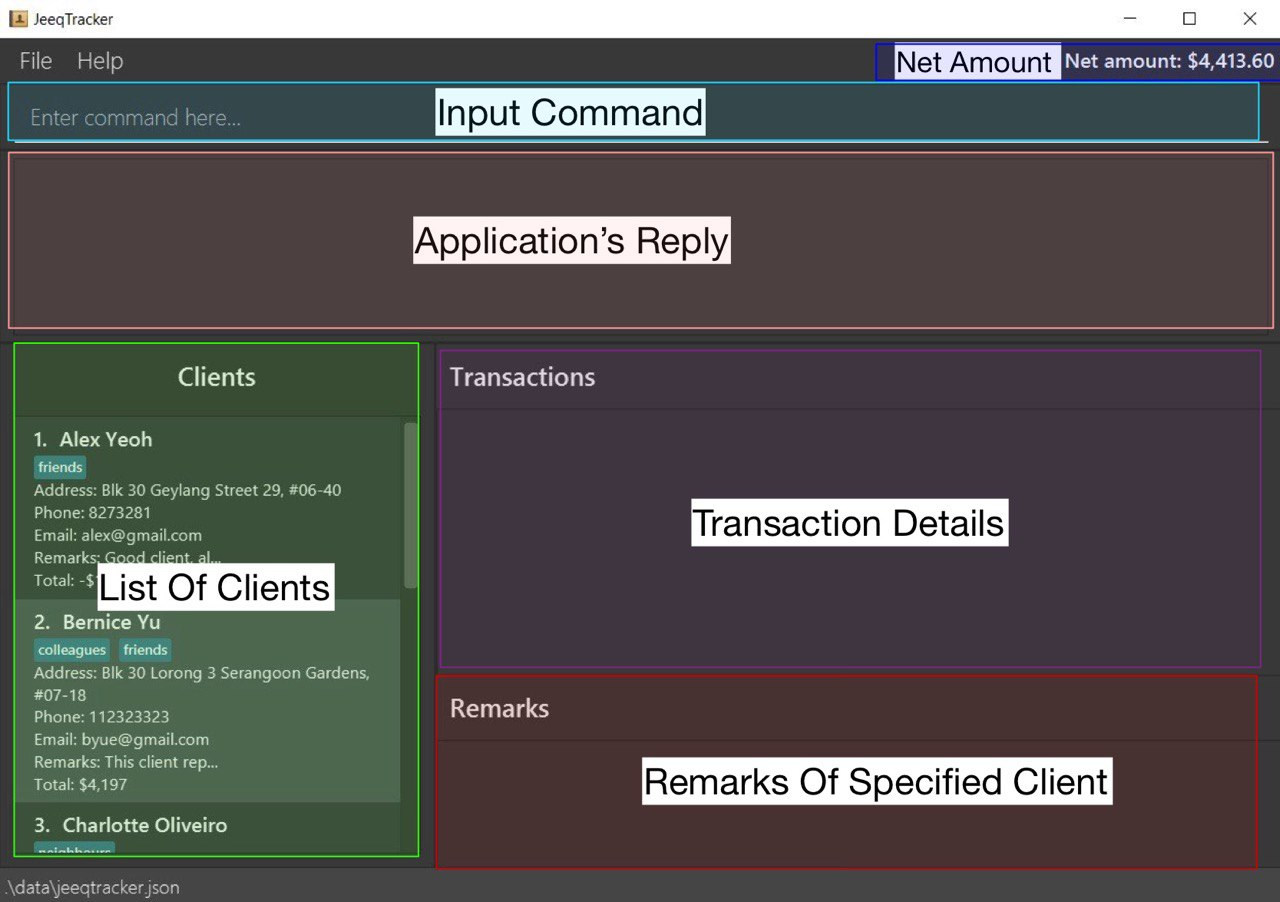
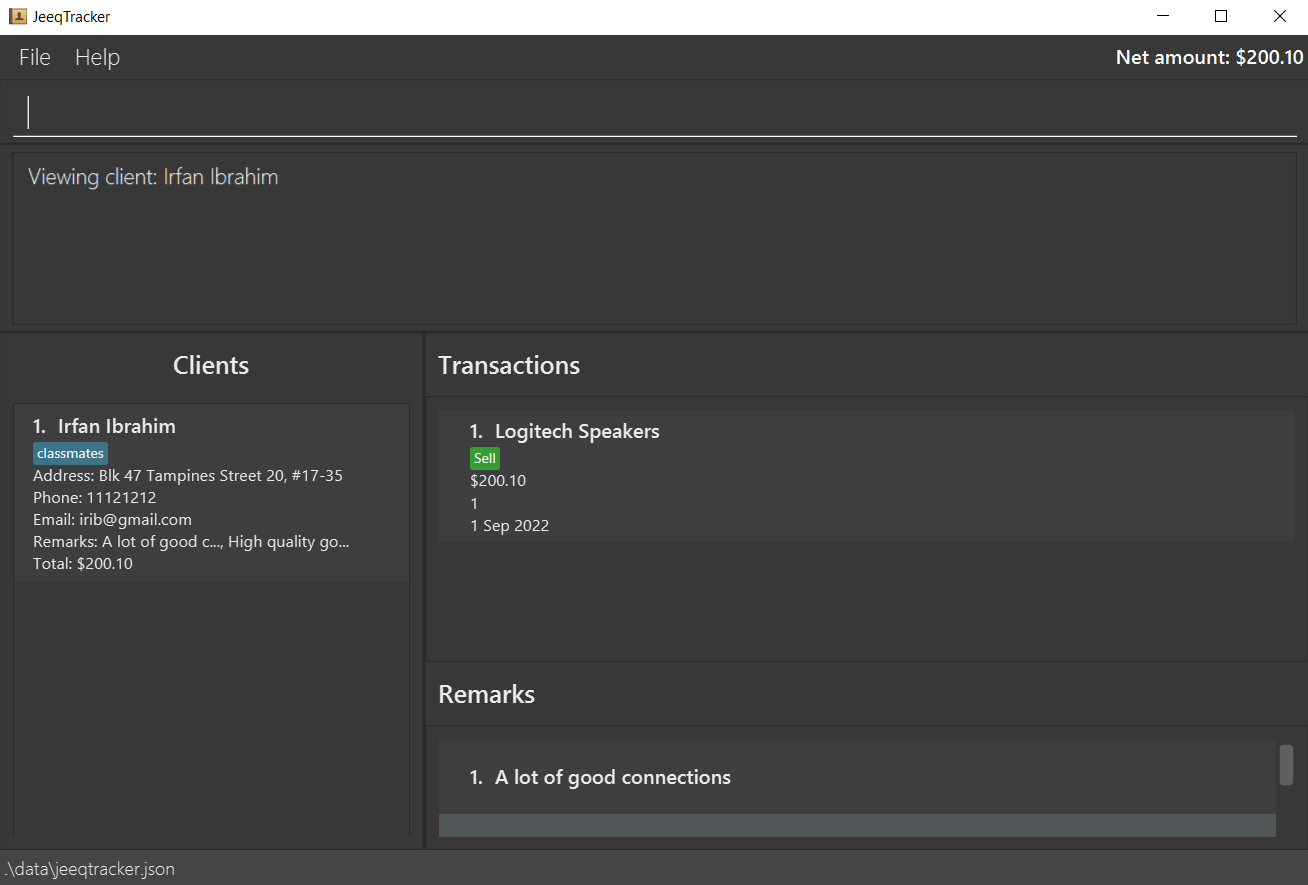
This application UI is split into 5 sections.
- Input Command: This is where you should key in your commands, and press enter to execute
- Application’s Reply: Errors or success messages will appear here after you execute any commands
- List Of Clients: Every client that you have will appear here
- Transaction Details: A list of transactions with a specific client will appear here if you use the view command, or it will show all transactions with every client if you use the filter command
- Remarks Of Specified Client: Remarks of specified client will appear here
- Net amount : This section displays the net amount transacted with all clients currently displayed in the List Of Clients panel on the left. Currently, only dollars is supported in our application. More currency will be added in the future.
Tip: These user interface sections will be referred to several times in the User Guide, it will be in italics!
How to use the User Guide
This user guide contains detailed explanation on how to use the application. It provides information like what each command does, and how data is saved in the application.
The table of contents provides links to every command. But before you head there, below are some notes on how to interpret each command format.
![]() Notes about the command format:
Notes about the command format:
-
Words in UPPER_CASE are the parameters to be supplied by you.
e.g. inadd n/NAME,NAMEis a parameter which can be used asadd n/Alice. -
Items in square brackets are optional.
e.g.n/NAME [t/TAG]can be used asn/John Doe t/friendor asn/John Doe. -
Items with
… after them can be used multiple times including zero times.
e.g.[t/TAG]…can be used ast/friend,t/friend t/familyetc. -
Parameters can be in any order.
e.g. if the command specifiesn/NAME p/PHONE_NUMBER,p/PHONE_NUMBER n/NAMEis also acceptable. -
If a parameter is expected only once in the command, but you specified it multiple times, only the last occurrence of the parameter will be taken.
e.g. if you specifyn/Alice n/Bob, onlyn/Bobwill be taken. -
Extraneous parameters for commands that do not take in parameters (such as
list,exitandclear) will be ignored.
e.g. if the command specifieslist 123, it will be interpreted aslist. -
A list of prefixes that you will encounter can be found here.
Symbols and Annotations
Below are some symbols and annotations that you may encounter in the User Guide.
| Symbol / Annotation | Meaning |
|---|---|
| Something that could cause irreversible damage when done incorrectly | |
| A potential source of error, and should be noted | |
| Tips that can aid you to optimally utilise JeeqTracker | |
| Important information to take note of | |
| Bolded Text | Emphasizes important terms to look out for |
Text wrapped in a box |
Denotes terms related to a command or field |
| Italic Text | Denotes a user interface component name, located here |
Tip: It is recommended to understand the User Interface as it will help you to navigate the application easily!
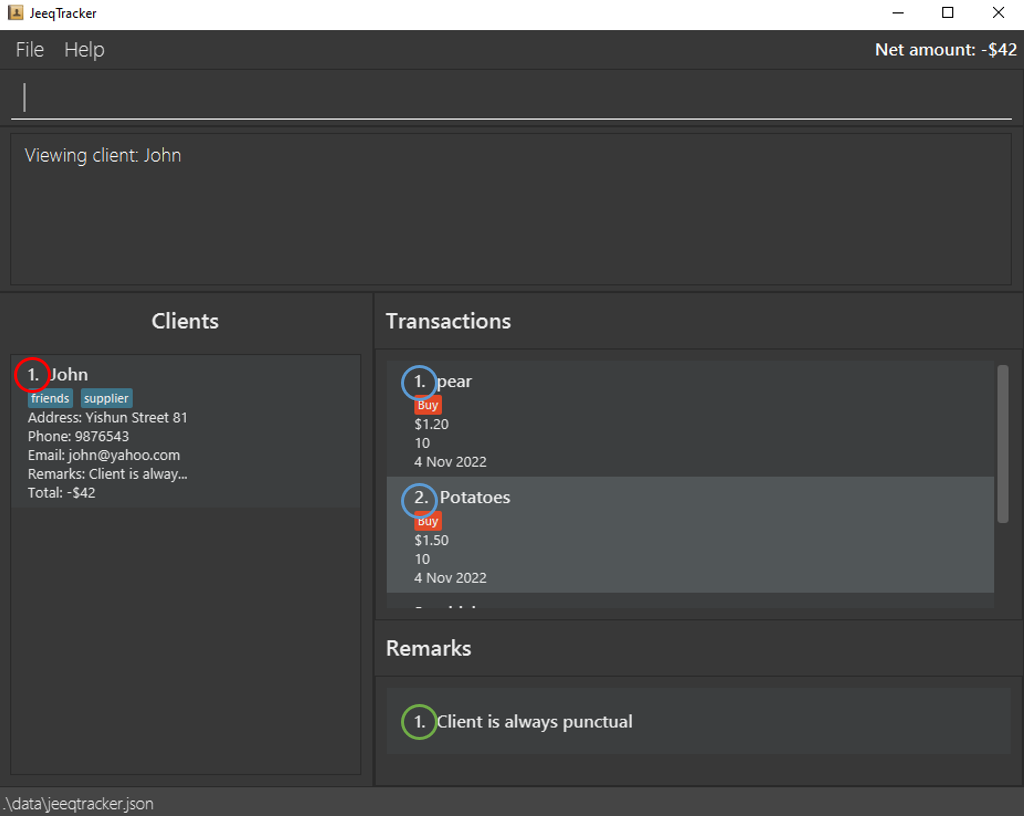
Tip: The term INDEX will appear in several command formats.
Red circle in the diagram below refers to the INDEX for clients.
Blue circles refer to the INDEX for transactions.
Green circles refer to the INDEX For remarks.
You are now ready to use the application! Head over to Quick Start to start using the application.
Features
This section showcases all commands in JeeqTracker that you can use. It is split into five sections, namely Client Commands, Transaction Commands, Remark Commands, Miscellaneous Commands, and Data Storage.
Client Commands
The following section highlights all commands related to clients.
Adding a client: add
Adds a new client to your List Of Clients panel.
Format: add n/NAME a/ADDRESS p/PHONE e/EMAIL [t/TAG]...
-
TAGis optional. - Multiple
TAGcan be tagged to the client. - No restrictions on the
PHONEinput andEMAILinput. You can enter anything that you want.
However, a warning will be given if it deviates from the standard convention.- This facilitates more freedom to input phone numbers like
+606 89987755 (HOME)and emails likealice@company.com (WORK)
- This facilitates more freedom to input phone numbers like
| Field | Standard Convention |
|---|---|
PHONE |
Contains only numbers, and at least 3 digits long |
EMAIL |
Format: local-part@domain1. Local-part should only contain alphanumeric characters and these special characters +, _, ., -. The local-part may not start or end with any special character.2. This is followed by a @ and then a domain name. The domain name is made up of domain labels separated by periods. The domain name must: - end with a domain label at least 2 characters long - have each domain label start and end with alphanumeric characters - have each domain label consist of alphanumeric characters, separated only by hyphens, if any |
Warning: You cannot add a client with a name that already exists in JeeqTracker
Names are considered duplicates even if they differ by case sensitivity or whitespaces!
Examples:
-
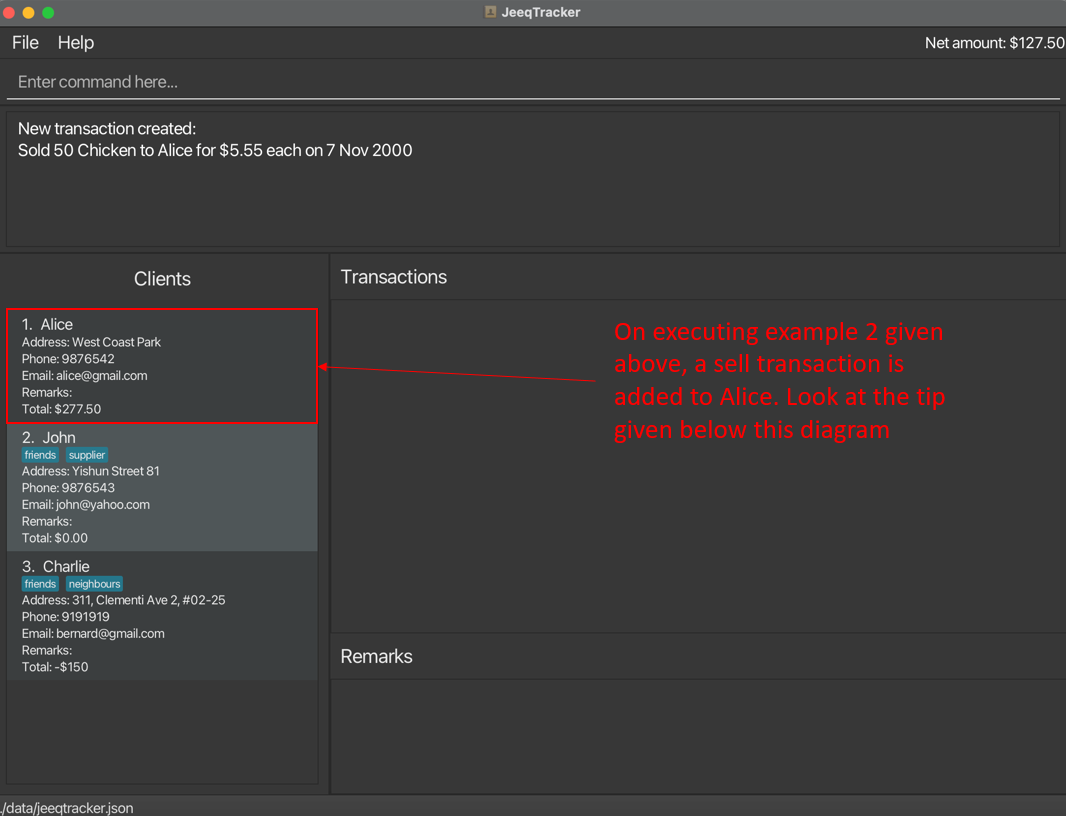
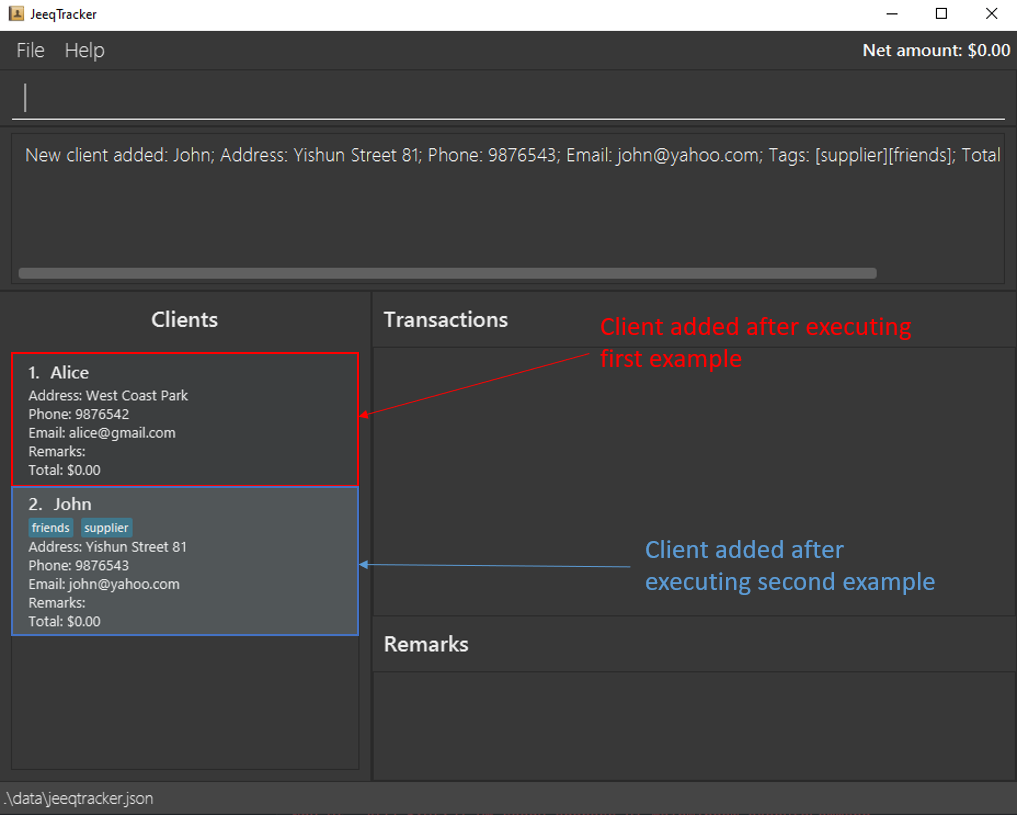
add n/Alice a/West Coast Park p/9876542 e/alice@gmail.comadds a new client, Alice with the specified address, phone and email to the List Of Clients panel, as depicted by the diagram below. -
add n/John a/Yishun Street 81 p/9876543 e/john@yahoo.com t/friends t/supplieradds a new client, John with the specified address, phone, email, and tags to the List Of Clients panel.
Listing all clients: list
Lists all the clients stored in JeeqTracker.
This command is required for you because some other commands like find, sort, view will filter the List Of Clients panel.
Format: list
- Displays all the clients and their details (
Name,Address,Phone,Remarks,Total) in JeeqTracker. - If JeeqTracker is empty, the List Of Clients panel will be blank.
Editing a client: edit
Edits the details of a client.
Format: edit INDEX m/client FIELDS [MORE_FIELDS]...
| Parameter | Description |
|---|---|
INDEX |
Refers to the index number shown in the List Of Clients panel. - Must be positive integer e.g 1, 2, 3, … - Must not contain any signs e.g +1, -3, … |
FIELDS |
Refers to the parameters to be changed for the client - [n/NAME] - [a/ADDRESS] - [p/PHONE] - [e/EMAIL]- [t/TAG]: Multiple tags are allowed in this command as the entire existing tag list will be replaced with the new tags |
Examples:
-
edit 1 m/client a/Blk 221 Yishun St 81replaces the 1st client’s address with the new input. -
edit 2 m/client a/Blk 333 Clementi Ave 1 p/8765432replaces the 2nd client’s address and phone number with the new inputs. -
edit 3 m/client n/John tanreplaces the 3rd client’s name with the new input.
Deleting a client: delete
Deletes a specified client from JeeqTracker.
Format: delete INDEX m/client
- The
INDEXrefers to the index number shown in the List Of Clients panel. -
INDEXmust be a positive integer e.g 1, 2, 3, …
Examples:
-
delete 1 m/clientdeletes the 1st client in the displayed List Of Clients panel. -
delete 2 m/clientdeletes the 2nd client in the displayed List Of Clients panel.
❗ Danger: Deleting a client is an irreversible process
Be very careful here!
Locating clients by name: find
Finds clients whose names contain any of the given keywords.
Format: find KEYWORD [MORE_KEYWORDS]...
- The search is case-insensitive. e.g. alice will match Alice
- The order of the keywords does not matter. e.g. Hans Bo will match Bo Hans
- Only the name is searched.
- Only full words will be matched e.g. Jame will not match James
- Clients matching at least one keyword will be returned (i.e.
ORsearch). e.g.John Bob Limwill return John Koh, Bob Tan
Examples:
-
find Johnreturns clients John, John Lim, John Koh -
find Tanreturns clients John Tan, Bob Tan, Alice Tan
Viewing a client: view
Displays the remarks and transactions of the specified client. The List Of Clients panel will be filtered to display only the specified client.
Format: view INDEX
- Views the client at the specified
INDEX. -
INDEXrefers to the index number shown in the displayed List Of Clients panel. - The
INDEXmust be a positive integer 1, 2, 3, … - The
INDEXmust not contain any signs e.g +1, -3, …
Example:
-
view 5displays the remarks and transactions of the client at the 5th index.
Tip: Use the list command if you want to get back the full list of clients
Transaction Commands
The following section highlights all commands related to transactions.
Creating a transaction: buy or sell
Adds a buy or sell transaction to the Transaction Details panel of a specified client.
Formats:
buy INDEX q/QUANTITY g/GOODS price/PRICE [d/DATE]
sell INDEX q/QUANTITY g/GOODS price/PRICE [d/DATE]
Parameter constraints:
| Parameter | Constraints |
|---|---|
INDEX |
- Refers to the index number shown in the List Of Clients panel. - Must be a positive integer e.g 1, 2, 3, … - Must not contain any signs e.g +1, -3, … |
QUANTITY |
- Refers to the amount of the goods transacted. - Must be a positive integer - Must not contain any signs |
GOODS |
- Refers to the name of the goods transacted. - Must contain alphanumeric characters - Must not be blank. |
PRICE |
- Refers to the price of the goods transacted. - Must be a positive number e.g. 1.5, 2.3, 5 - Must not contain any signs - Prices will be rounded up to 2 decimal places. |
DATE |
- Refers to the date of the transaction. - Must be in the format of DD/MM/YYYY. - If date is left empty, the current date will be used. |
Examples (refer to diagram below as well):
-
buy 3 q/100 g/apples price/1.5creates a buy transaction for the 3rd client, Charlie in the List Of Client panel. -
sell 1 q/50 g/Chicken price/5.55 d/07/11/2000creates a sell transaction for the 1st client, Alice in the List Of Client panel on the 07/11/2000.
Tip: If you use the “buy” or “sell” command while the List Of Clients panel has more than one client, you will not be able to see the addition.
Use the view command to see it.
Editing a transaction: edit
Edits a transaction specified by the index number.
Format: edit INDEX m/transaction FIELDS [MORE_FIELDS]...
| Parameter | Constraints |
|---|---|
INDEX |
- Refers to the index number shown in the Transaction Details panel. - Must be a positive integer within the range displayed - Must not contain any signs e.g +1, -3, … |
FIELDS |
- Refers to the parameters to be changed for the transaction. - [q/QUANTITY]- [g/GOODS]- [price/PRICE]- [d/DATE]
|
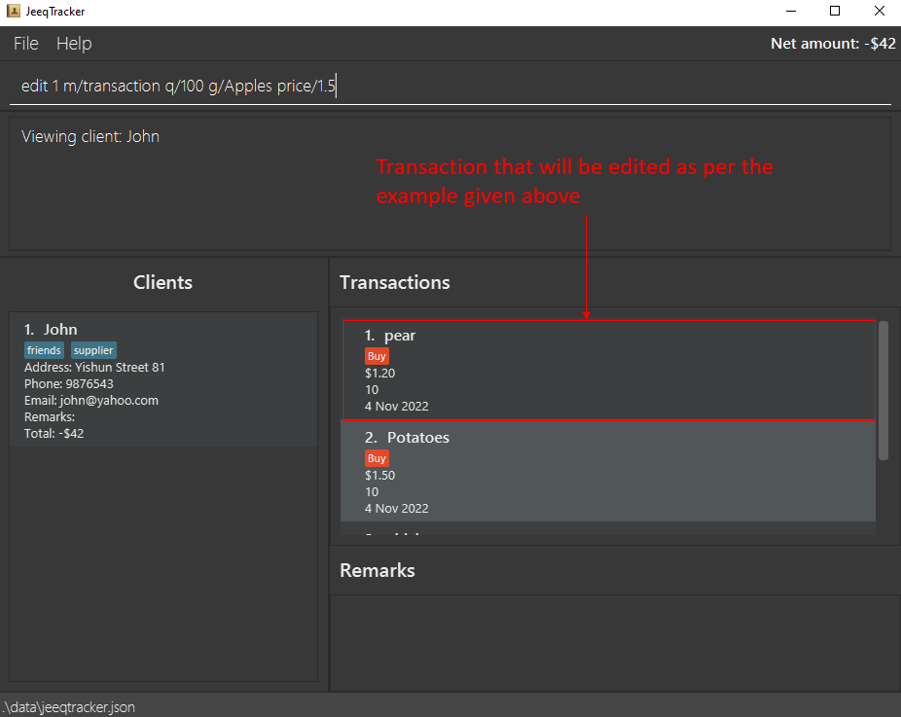
Example (refer to diagram below):
edit 1 m/transaction q/100 g/Apples price/1.5 edits the transaction at index 1 in the Transaction Details panel, to have a new name: Apples, quantity: 100, price: 1.5.
Warning: You must use view command first before you can edit a transaction. If not, there will be an error within the application!
Deleting a transaction: delete
Deletes a transaction specified by the index number.
Format: delete INDEX m/transaction
-
INDEXrefers to the index number shown in the Transaction Details panel. -
INDEXmust be a positive integer, and must not contain any signs e.g. +1, -3.
Example:
delete 1 m/transaction deletes the transaction at index 1 in the Transaction Details panel.
Warning: You must use view command first before you can delete a transaction. If not, there will be an error within the application!
❗ Danger: Deleting a transaction is an irreversible process! It will be gone forever: Be very careful here!
Filtering buy or sell transactions: filter
Filters the buy or sell transactions of all the clients. After executing this command, the filtered transactions will be displayed in the Transaction Details panel while the List Of Clients panel will display all the clients.
Format: filter TYPE
- The
TYPErefers to the type of transactions to be displayed. It can only bebuyorsell. - If no clients made any transactions, the Transaction Details panel will be blank.
- After calling the
filtercommand, the List Of Clients panel will display all clients.
Examples:
-
filter buydisplays all buy transactions. -
filter selldisplays all sell transactions.
Tip: The transactions listed in List of Transactions panel does not belong to anyone, it is all transactions with all your clients
Sorting the transactions: sort
Sorts the specified client’s transaction by either the latest transaction or oldest transaction (defined by date).
Format: sort INDEX ORDER
- The Transaction Details panel will be empty if the client does not have any transactions.
| Parameter | Constraints |
|---|---|
INDEX |
- Refers to the index number shown in the List Of Clients panel. - Must be a positive integer within the range displayed - Must not contain any signs e.g +1, -3, … |
ORDER |
- Refers to how the transaction will be sorted. - Order of sorting can only be oldest or latest. |
Examples:
-
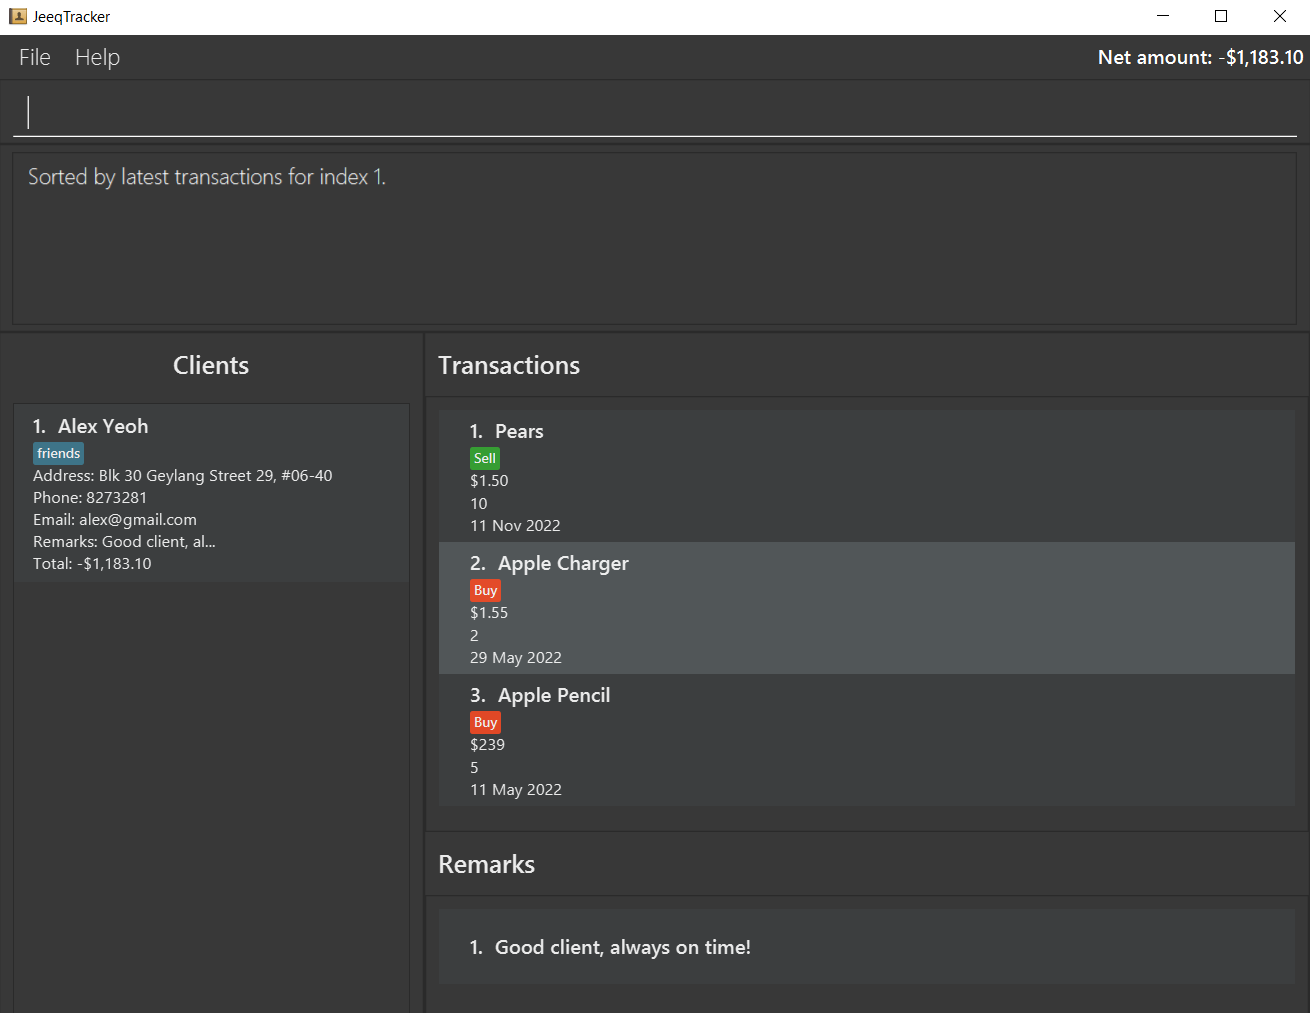
sort 1 latestdisplays the 1st client transactions sorted by the latest transaction in the Transaction Details panel.
Tip: The sort command will filter the List Of Clients panel to display only the specified client.
Use the list command to get back the full list of clients.
Remark Commands
The following section highlights all commands related to remarks.
Creating a remark: remark
Creates a new remark for the specified client.
Format: remark INDEX REMARK
| Parameter | Constraints | |
|---|---|---|
INDEX |
- Refers to the index number shown in the List Of Clients panel. - Must be a positive integer within the range displayed. - Must not contain any signs e.g +1, -3, … |
|
REMARK |
- Refers to the new remark. - Must be filled |
Examples:
-
remark 1 punctual buyeradds the remark punctual buyer to the client at index 1 of the List Of Clients panel.
Tip: If you use the
remarkcommand while the List of Clients Panel has more than one client, you will not be able to see the addition.
Use the view command to see it.
Editing a remark: edit
Edits a remark for a specified client.
Format: edit INDEX m/remark REMARK
| Parameter | Constraints |
|---|---|
INDEX |
- Refers to the index number shown in the Remarks Of Specified Client panel. - Must be a positive integer within the range displayed - Must not contain any signs e.g +1, -3, … |
REMARK |
- Refers to the new remark. - It must be filled. |
Example:
edit 1 m/remark Client replies very fast edits the remark at index 1 to Client replies very fast in the Remarks of Specified Client Panel.
Warning: You must use view command first before you can edit a remark. If not, there will be an error within the application!
Deleting a remark: delete
Deletes a remark for a client.
Format: delete INDEX m/remark
-
INDEXrefers to the index number shown in the Remarks Of Specified Client panel. - Must be a positive integer within the range display, and must not contain any signs e.g. +1, -3.
Warning: You must use view command first before you can delete a remark. If not, there will be an error within the application!
❗ Danger: Deleting a remark is an irreversible process: Be very careful here!
Example:
delete 1 m/remark deletes the remark at index 1 in the Remarks Of Specified Client panel.
Miscellaneous Commands
This section contains all miscellaneous commands.
Clearing all entries: clear
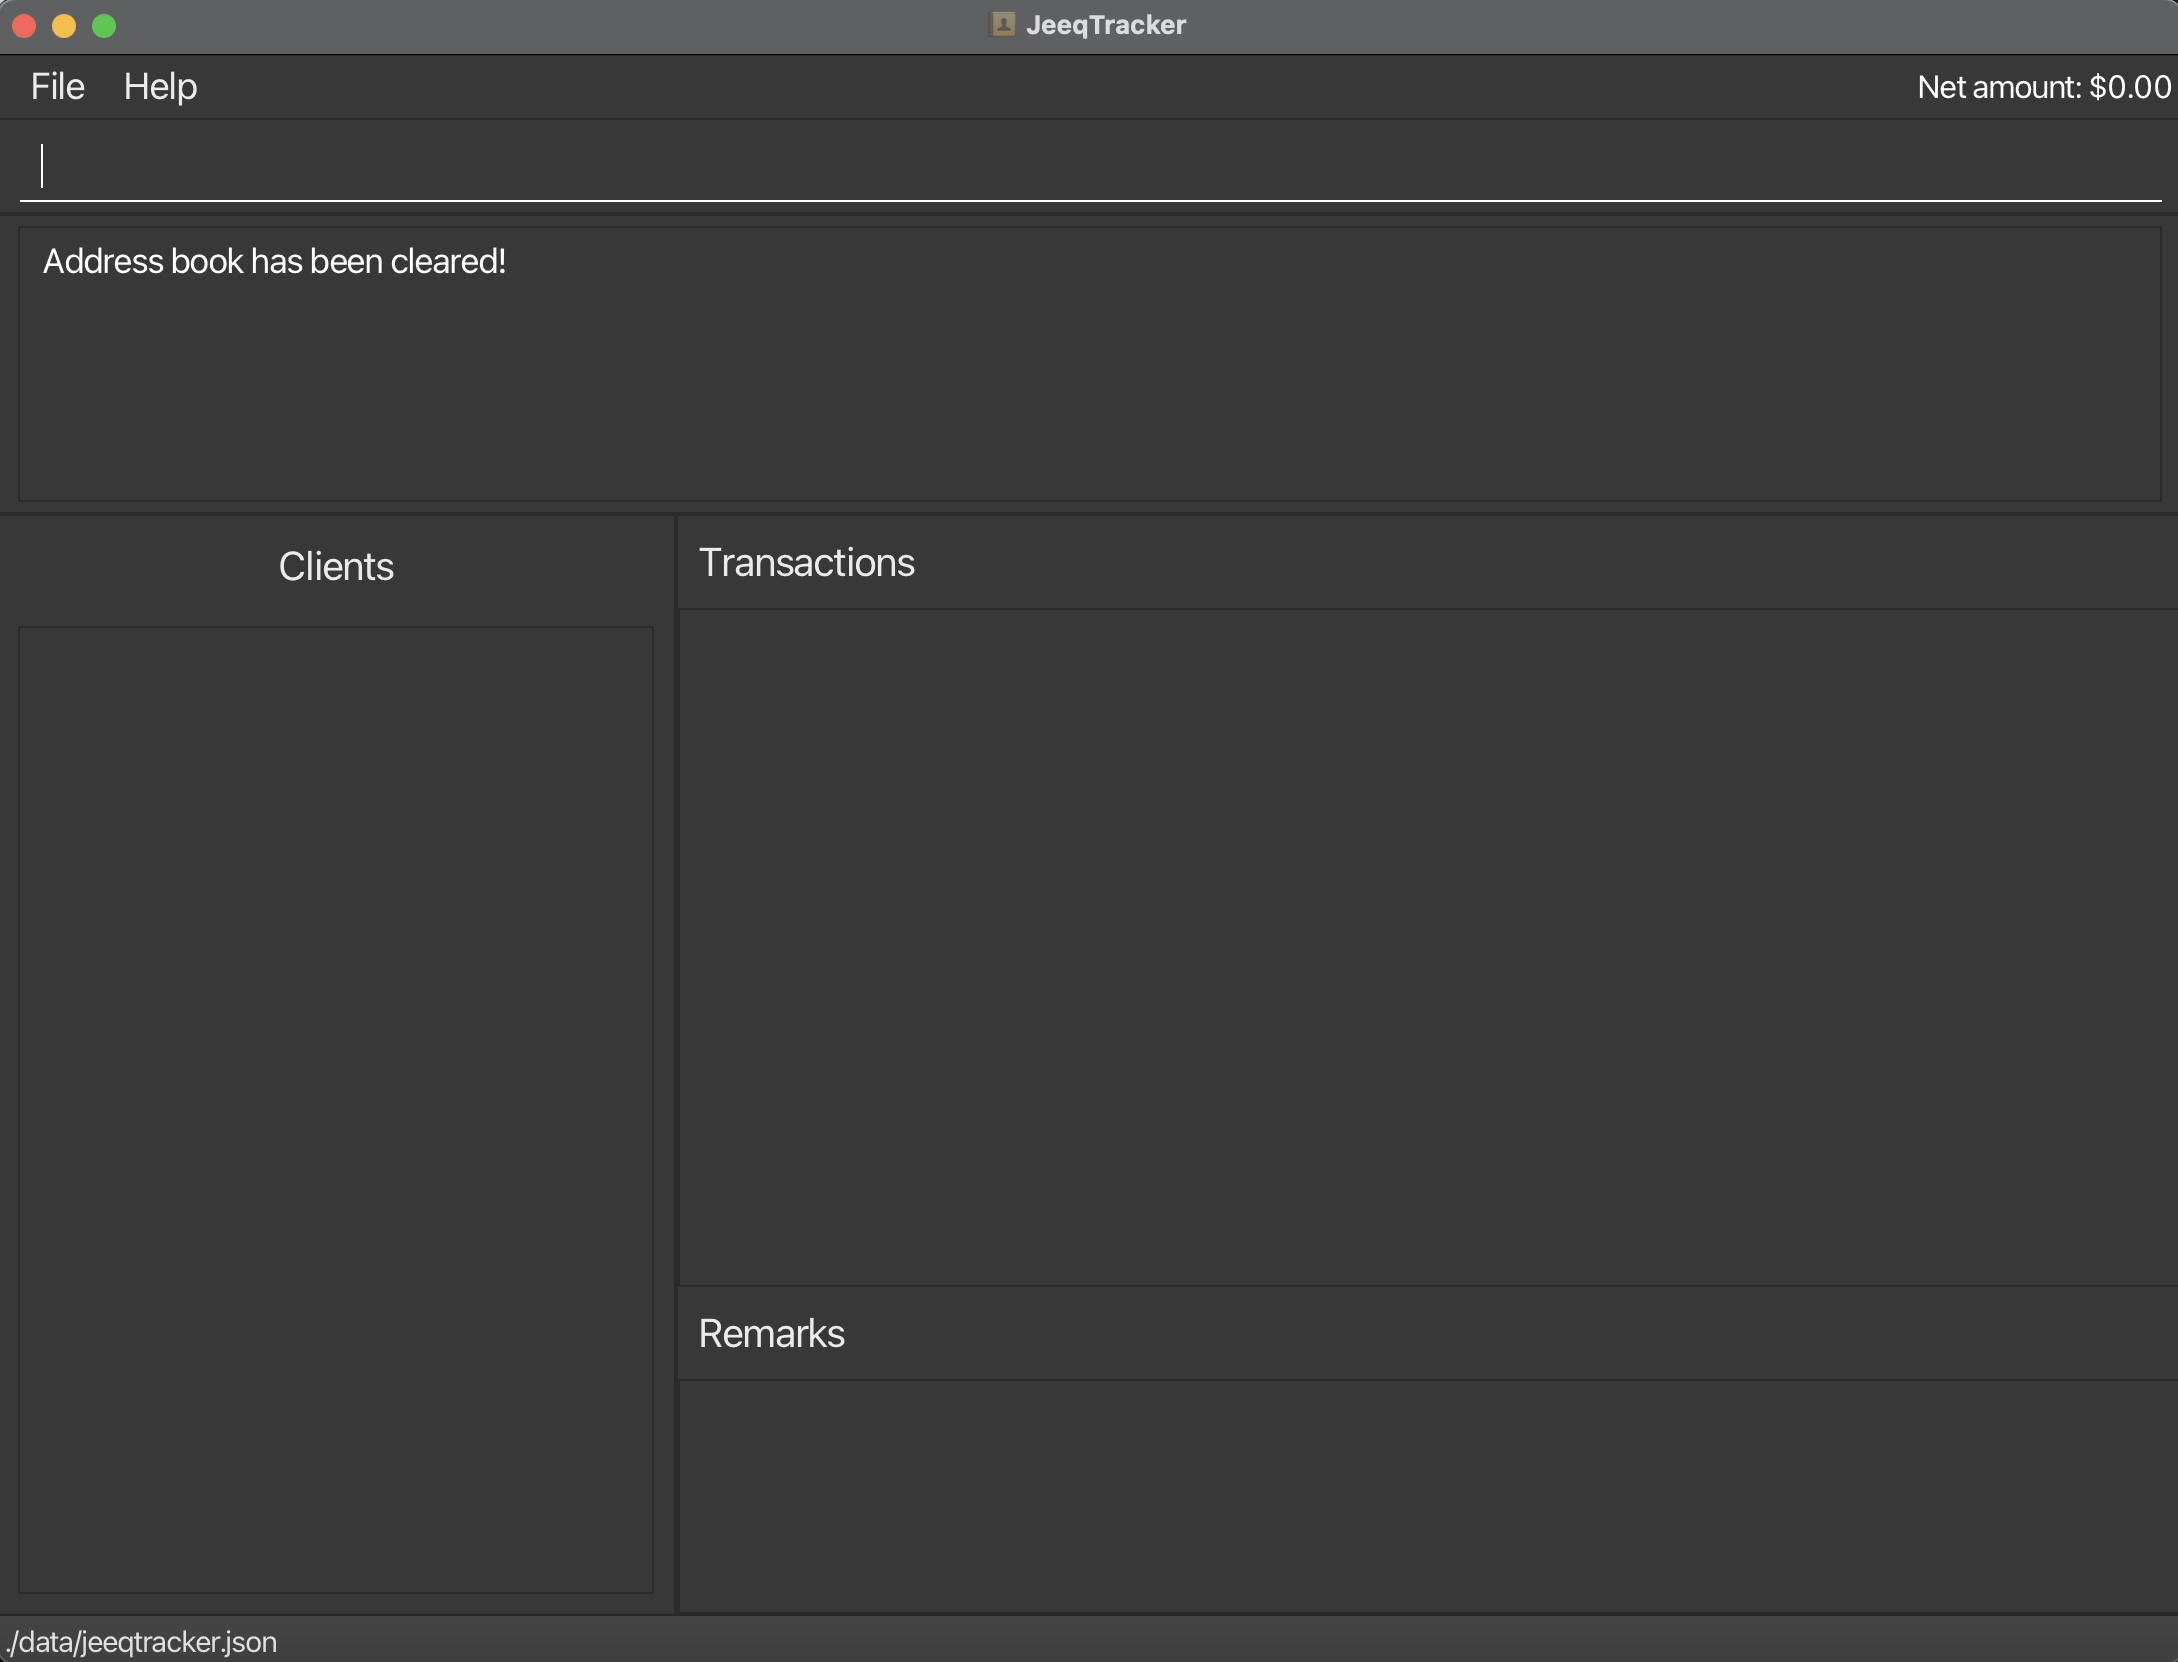
Clears all entries which include clients, remarks and transactions from JeeqTracker.
Format: clear
❗ Danger: Information cleared by clear command cannot be retrieved. Only use this if you want to clear all data of clients, remarks and transactions.
Example:
-
cleardeletes all client’s entries together with the remarks and transactions.
Exiting the program: exit
Exits the program.
Format: exit
- All entries will not be deleted.
- All information edited will be saved.
Example:
-
exitcloses the program.
Viewing help: help
help returns the list of all commands in the Application’s Reply panel.
help [COMMAND] returns the detailed description of that specified command in the Application’s Reply panel.
Format: help or help [COMMAND]
- The
COMMANDrefers to any valid command that is implemented.
Examples:
-
helpshows the list of valid commands. -
help findshows the description offindcommand. -
help addshows the description ofaddcommand.
Getting the User Guide: user_guide
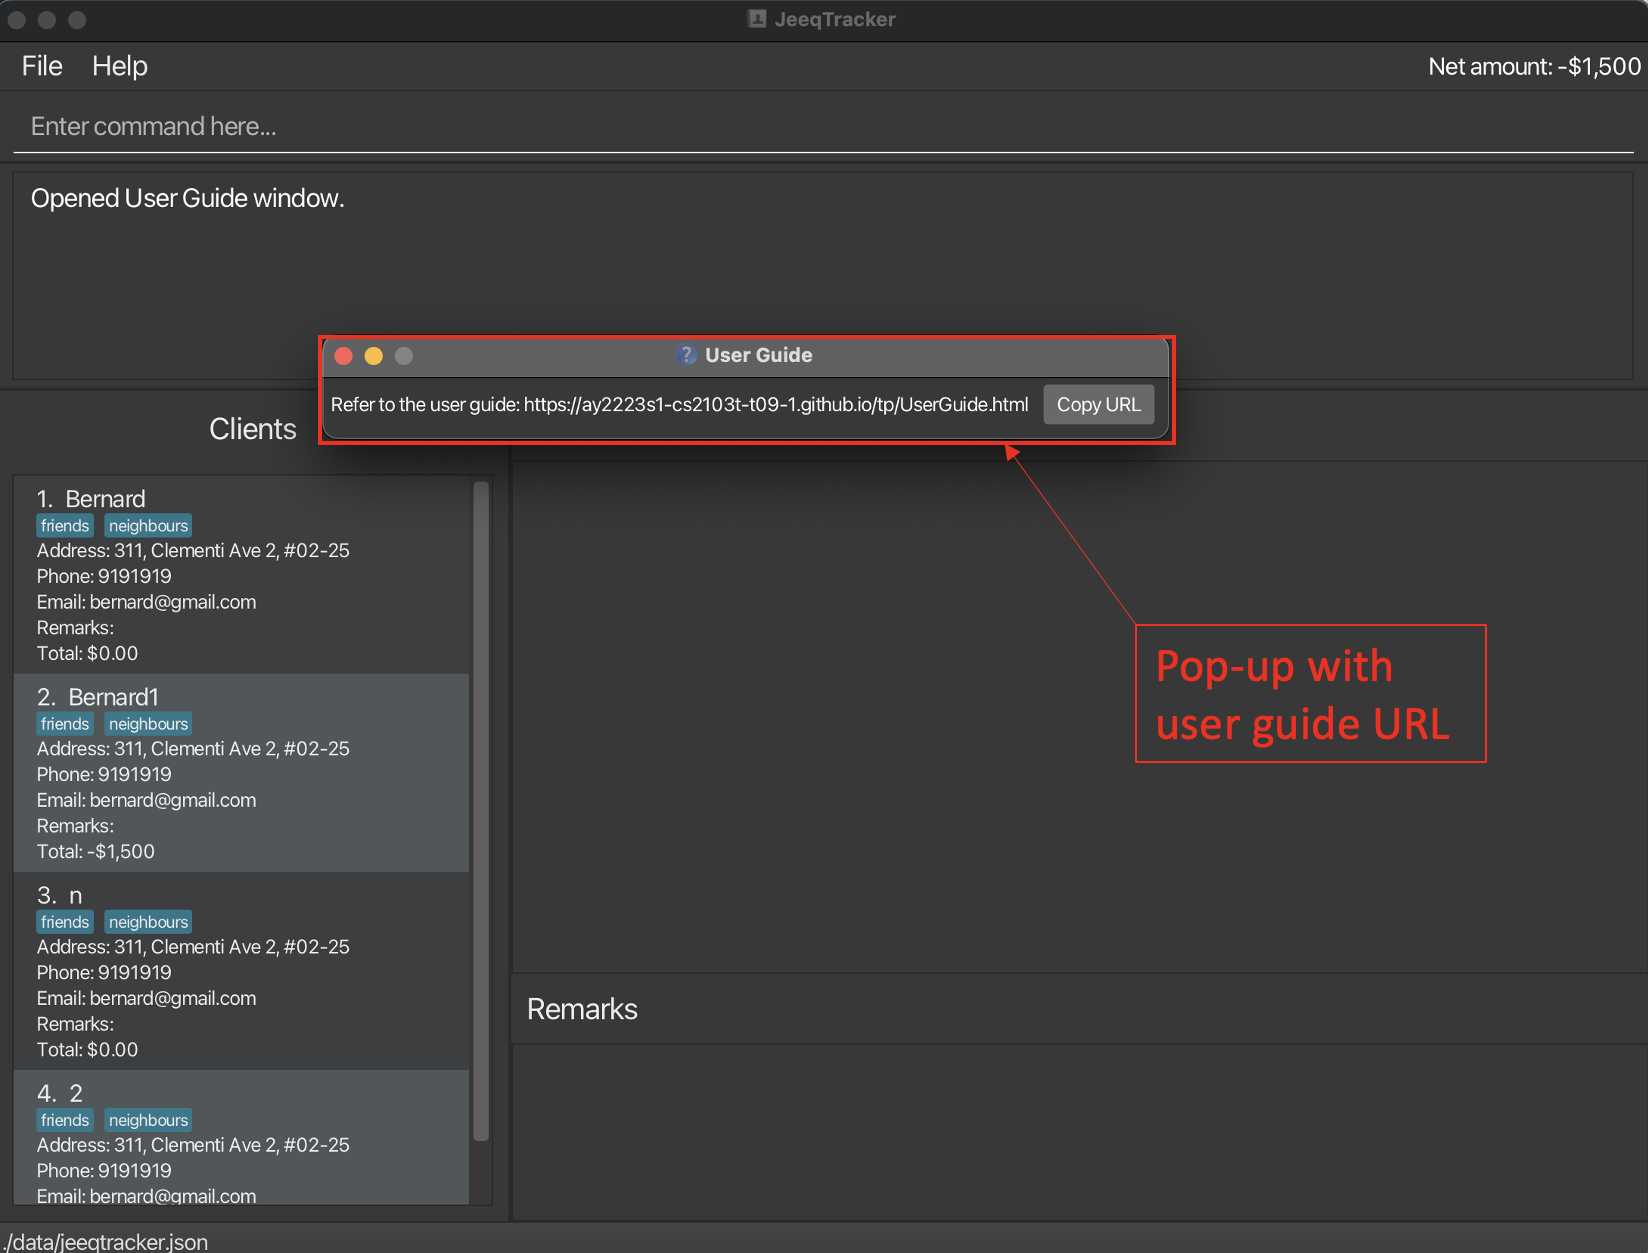
Displays the link to this user guide in a pop-up window.
Format: user_guide
- Displays a pop-up that contains the url to this user guide.
- You can click on the
Copy URLbutton to copy this url to your clipboard and paste it in your browser if you need to refer to this user guide.
Data Storage
This section highlights how your data is stored with JeeqTracker.
Saving the data
JeeqTracker data are saved in the hard disk automatically after any command that changes the data. There is no need to save manually.
Editing the data file
JeeqTracker data are saved as a JSON file “[JAR file location]/data/jeeqtracker.json”. If you are an advanced user, you are welcome to update data directly by editing that data file.
Danger: If your changes to the data file makes its format invalid, JeeqTracker will discard all data and start with an empty data file at the next run.
Archiving data files [coming in v2.0]
Details coming soon …
FAQ
Q: How do I transfer my data to another Computer?
A: Install the app in the other computer and overwrite the empty data file it creates with the file that contains the data of your previous JeeqTracker home folder.
Command summary
| Action | Format, Examples |
|---|---|
| Add |
add n/CLIENT a/ADDRESS p/PHONE e/EMAIL [t/TAG]...e.g., add n/Alice a/Yishun Street 81 p/9876543 e/alice@gmail.com
|
| Buy |
buy INDEX q/QUANTITY g/GOODS price/PRICE [d/DATE] e.g., buy 2 q/100 g/apples price/1.5
|
| Clear | clear |
| Delete |
delete INDEX m/MODEe.g., delete 3 m/client or view 1 followed by delete 3 m/remark
|
| Edit |
edit INDEX m/MODE FIELDS [MORE_FIELDS]... e.g., edit 1 m/client a/Blk 221 Yishun St 81 p/818181 or view 1 followed by edit 3 m/transaction g/mango
|
| Exit | exit |
| Filter |
filter TYPE e.g., filter sell or filter buy
|
| Find |
find KEYWORD [MORE_KEYWORDS]...e.g., find John
|
| Help |
help [COMMAND] e.g., help or help add or help sort
|
| List | list |
| Remark |
remark INDEX REMARK [t/TAG]...e.g., remark 3 Punctual Buyer or remark 5 Fast and Decisive Buyer t/favourite
|
| Sell |
sell INDEX q/QUANTITY g/GOODS price/PRICE [d/DATE] e.g., sell 2 q/100 g/apples price/1.5 d/07/11/2022
|
| Sort |
sort INDEX ORDER e.g., sort 1 latest or sort 3 oldest
|
| User Guide | user_guide |
| View |
view INDEX e.g., view 5
|
Prefix Summary
| Prefix | Meaning | Restrictions | Example |
|---|---|---|---|
| n/ | Name of the client | Alphanumeric characters and spaces, required | n/Alice |
| a/ | Address of the client | Required | a/321 Clementi Road, #02-22 |
| p/ | Phone number of the client | Required | p/98765432 |
| e/ | Email of the client | Required | e/alice@gmail.com |
| g/ | Goods name involved in the transaction | Alphanumeric characters and spaces, required | g/Apples |
| q/ | Quantity of goods involved in the transaction | Positive integer, required | q/10 |
| price/ | Price per quantity of goods in the transaction | Positive number, required | price/1.50 |
| m/ | Mode of the command | Must be either client, transaction, or remark | m/client |
| d/ | Date of transaction | In the format dd/mm/yyyy | d/07/11/2022 |
| t/ | Tag applied on clients | Alphanumeric, single word | t/friends |
