Developer Guide
Table of Contents
- Acknowledgements
- Setting up, getting started
- Design
- Implementation
- Documentation, logging, testing, configuration, dev-ops
- Appendix: Requirements
- Appendix: Instructions for manual testing
Acknowledgements
This project is based on the AddressBook-Level3 project created by the SE-EDU initiative
The following are some reused/adapted ideas, code, and documentation from AB3:
-
clientis inspired from Person -
findis reused - The User Interface is adapted from AB3
- Developer Guide is built up from AB3
Setting up, getting started
Refer to the guide Setting up and getting started.
Design
.puml files used to create diagrams in this document can be found in the diagrams folder. Refer to the PlantUML Tutorial at se-edu/guides to learn how to create and edit diagrams.
Architecture

The Architecture Diagram given above explains the high-level design of the App.
Given below is a quick overview of main components and how they interact with each other.
Main components of the architecture
Main has two classes called Main and MainApp. It is responsible for,
- At app launch: Initializes the components in the correct sequence, and connects them up with each other.
- At shut down: Shuts down the components and invokes cleanup methods where necessary.
Commons represents a collection of classes used by multiple other components.
The rest of the App consists of four components.
-
UI: The UI of the App. -
Logic: The command executor. -
Model: Holds the data of the App in memory. -
Storage: Reads data from, and writes data to, the hard disk.
How the architecture components interact with each other
The Sequence Diagram below shows how the components interact with each other for the scenario where the user issues the command delete 1.

Each of the four main components (also shown in the diagram above),
- defines its API in an
interfacewith the same name as the Component. - implements its functionality using a concrete
{Component Name}Managerclass (which follows the corresponding APIinterfacementioned in the previous point.
For example, the Logic component defines its API in the Logic.java interface and implements its functionality using the LogicManager.java class which follows the Logic interface. Other components interact with a given component through its interface rather than the concrete class (reason: to prevent outside component’s being coupled to the implementation of a component), as illustrated in the (partial) class diagram below.

The sections below give more details of each component.
UI component
The API of this component is specified in Ui.java
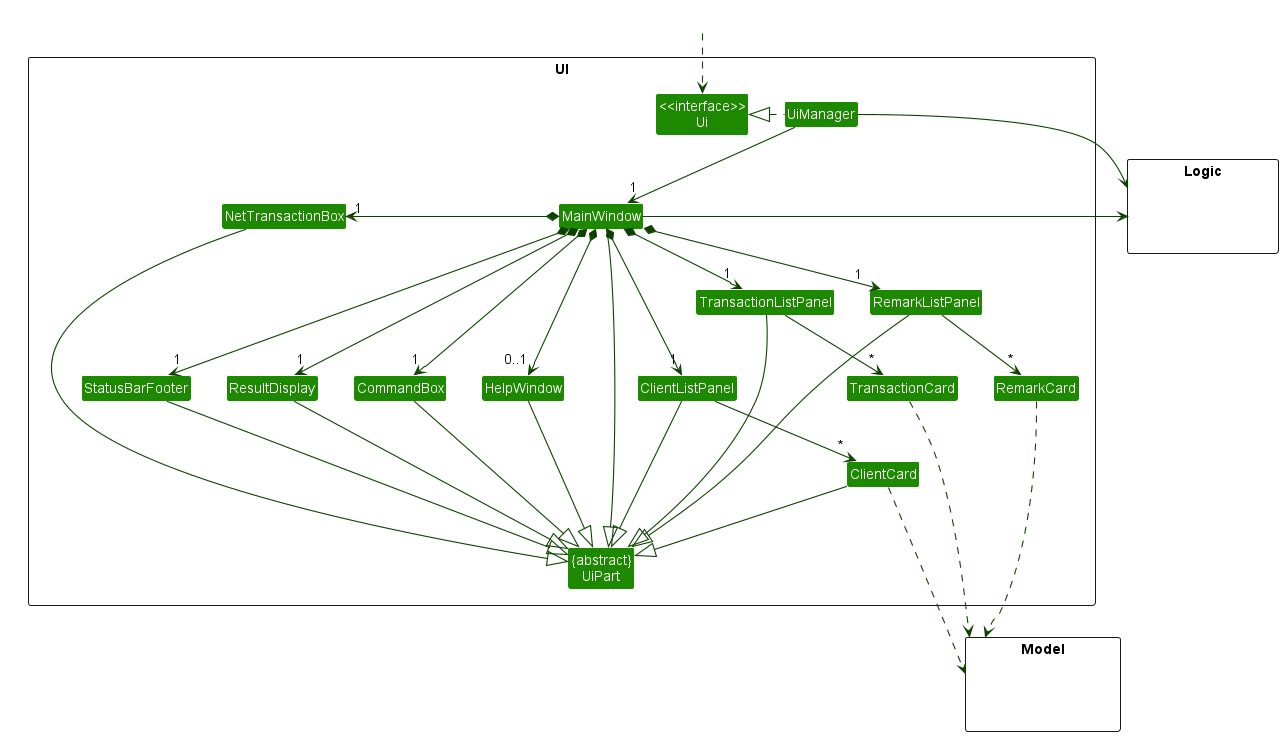
The UI consists of a MainWindow that is made up of parts (CommandBox, ResultDisplay, ClientListPanel, TransactionListPanel, RemarkListPanel, StatusBarFooter, HelpWindow, NetTransactionBox). All these, including the MainWindow, inherit from the abstract UiPart class which captures the commonalities between classes that represent parts of the visible GUI.
The ClientListPanel, TransactionListPanel, RemarkListPanel contains ClientCard, TransactionCard, RemarkCard respectively. These panels can hold any number of their respective card. These cards also inherit from the abstract UiPart, and represents the GUI of a single Client, Transaction, or Panel.
The UI component uses the JavaFx UI framework. The layout of these UI parts are defined in matching .fxml files that are in the src/main/resources/view folder. For example, the layout of the MainWindow is specified in MainWindow.fxml
The UI component,
- executes user commands using the
Logiccomponent. - listens for changes to
Modeldata so that the UI can be updated with the modified data. - keeps a reference to the
Logiccomponent, because theUIrelies on theLogicto execute commands. - depends on some classes in the
Modelcomponent, as it displaysClient,Transaction, andRemarkobject residing in theModel.
Logic component
API : Logic.java
Here’s a (partial) class diagram of the Logic component:

How the Logic component works:
- When
Logicis called upon to execute a command, it uses theJeeqTrackerParserclass to parse the user command. - This results in a
Commandobject (more precisely, an object of one of its subclasses e.g.,AddCommand) which is executed by theLogicManager. - The command can communicate with the
Modelwhen it is executed (e.g. to add a client). - The result of the command execution is encapsulated as a
CommandResultobject which is returned back fromLogic.
The Sequence Diagram below illustrates the interactions within the Logic component for the execute("delete 1") API call.

DeleteCommandParser should end at the destroy marker (X) but due to a limitation of PlantUML, the lifeline reaches the end of diagram.
Here are the other classes in Logic (omitted from the class diagram above) that are used for parsing a user command:

How the parsing works:
- When called upon to parse a user command, the
JeeqTrackerParserclass creates anXYZCommandParser(XYZis a placeholder for the specific command name e.g.,AddCommandParser) which uses the other classes shown above to parse the user command and create aXYZCommandobject (e.g.,AddCommand) which theJeeqTrackerParserreturns back as aCommandobject. - All
XYZCommandParserclasses (e.g.,AddCommandParser,DeleteCommandParser, …) inherit from theParserinterface so that they can be treated similarly where possible e.g, during testing.
Model component
API : Model.java
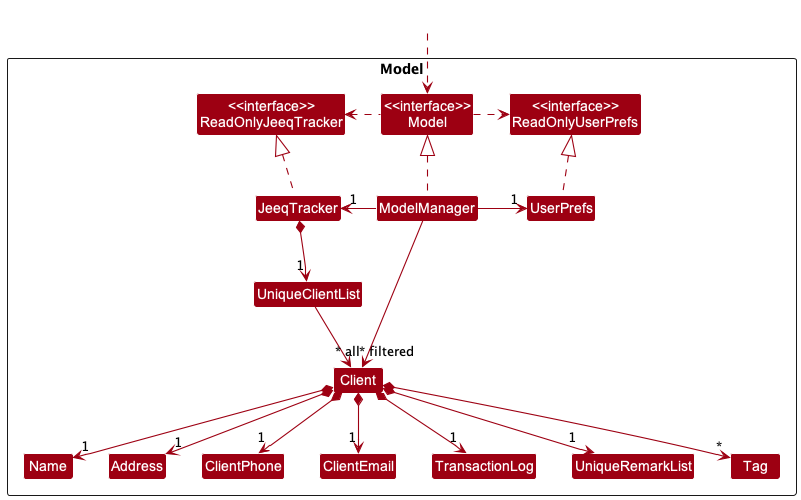
The Model component,
- stores the address book data i.e., all
Clientobjects (which are contained in aUniqueClientListobject). - stores the currently ‘selected’
Clientobjects (e.g., results of a search query) as a separate filtered list which is exposed to outsiders as an unmodifiableObservableList<Client>that can be ‘observed’ e.g. the UI can be bound to this list so that the UI automatically updates when the data in the list change. - stores a
UserPrefobject that represents the user’s preferences. This is exposed to the outside as aReadOnlyUserPrefobjects. - does not depend on any of the other three components (as the
Modelrepresents data entities of the domain, they should make sense on their own without depending on other components)
Transaction Class Each
Client Class has a TransactionLog which stores all transactions of the client in a List. The Transaction object contains the Goods transacted,
Price of the goods, Quantity of goods and Date of the transaction. 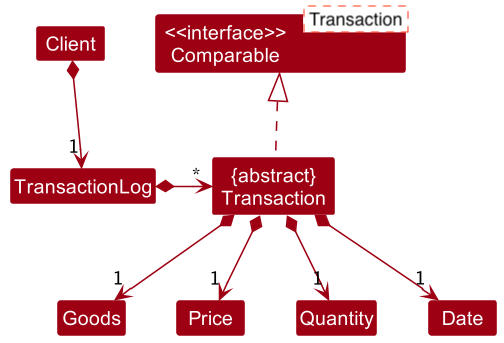
Remark Class Each
Client Class has a UniqueRemarkList which stores Remark object that do not
have the same Text (case-insensitive). The Remark object contains the
Text which represents the remark’s text. 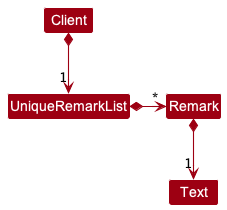
Storage component
API : Storage.java
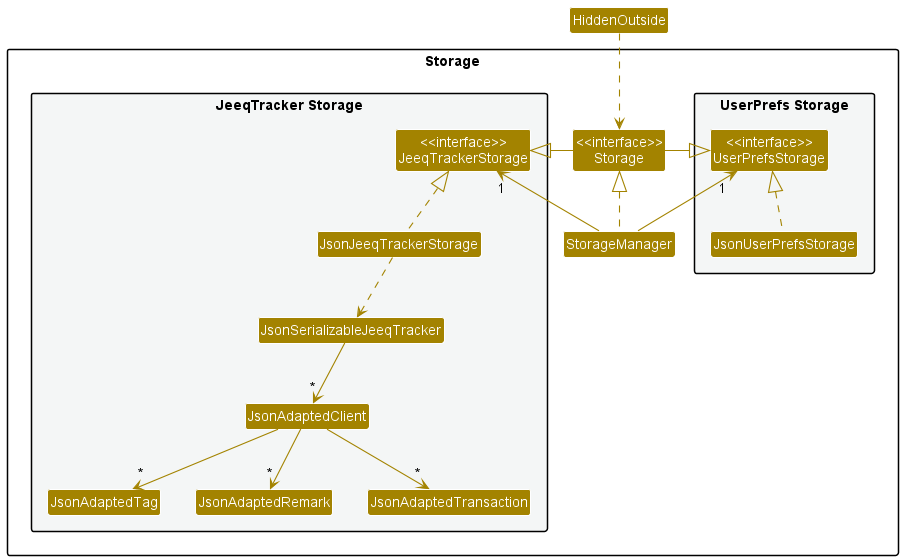
The Storage component,
- can save both jeeqtracker data and user preference data in json format, and read them back into corresponding objects.
- inherits from both
JeeqTrackerStorageandUserPrefStorage, which means it can be treated as either one (if only the functionality of only one is needed). - depends on some classes in the
Modelcomponent (because theStoragecomponent’s job is to save/retrieve objects that belong to theModel)
Common classes
Classes used by multiple components are in the seedu.jeeqtracker.commons package.
Implementations
This section describes some noteworthy details on how certain features are implemented.
Filter feature for transactions
Implementation
The filter transaction mechanism is facilitated by FilterTransCommand which extends from Command and FilterTransCmdParser which extends from Parser. To invoke the filter command, FilterTransCmdParser will parse the arguments from the user input via FilterTransCmdParser#parse() and returns the filter command if the arguments are valid.
FilterTransCommand calls the FilterTransCommand#execute() operation which executes the command and returns the result message in a CommandResult object.
The operation is exposed in the Logic interface as Logic#execute().
Given below is an example usage scenario and how the filter mechanism behaves at each step.
Step 1. The user launches the application. The UiManager will call on the MainWindow to invoke the UI which displays all the clients.
Step 2. The user executes filter buy command to filter all the buy transactions from all the clients. This is done by calling the
Client#getBuyTransactionList() which returns an unmodifiable view of the buy transaction list.
Step 3. The CommandResult of FilterTransCommand will call MainWindow#handleFilterTransaction(),
to display only the filtered buy transactions from the Client#getBuyTransactionList() while the client panel list will display all the clients.
The following sequence diagram shows how the filter operation works:
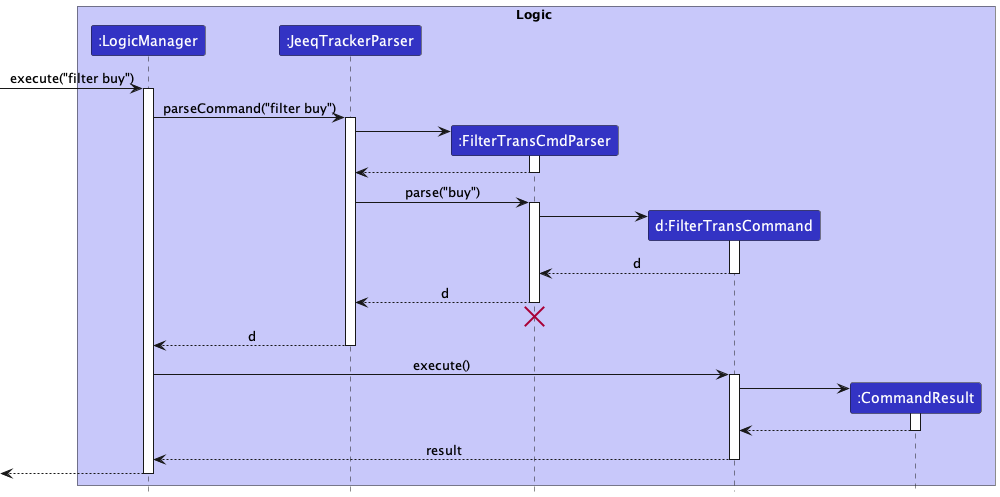
FilterTransCommand should end at the destroy marker (X) but due to a limitation of PlantUML, the lifeline reaches the end of diagram.
The following activity diagram summarizes what happens when a user executes the filter command:
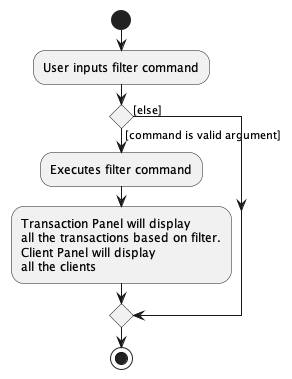
Design considerations:
Aspect: How filter transaction executes:
-
Alternative 1 (current choice): Filter all the transactions made by all the clients.
- Pros: Easy to implement and allow the user to see all the buy or sell transactions at one glance.
- Cons: May have performance issues due to searching through all transactions of each client. Unable distinguish which transaction belong to which client.
-
Alternative 2: Individual filter transaction for each client.
- Pros: Performs faster as the command only filters through one client transactions. Also, user would be able to know which client the filtered transactions are from.
- Cons: User would have to manually select each client and filter the transactions.
Buy/Sell feature for transactions
Implementation for Buy Transaction
The buy transaction mechanisms are facilitated by BuyCommand. The BuyCommand extends Command and BuyCommandParser which extends from Parser.
To invoke either of the commands, BuyCommandParser will parse the arguments from the user input via BuyCommandParser#parse() or and returns the buy command if the arguments are valid.
BuyCommand executes the BuyCommand#execute() operation which executes the command and returns the result message in a
CommandResult object.
The operation is exposed in the logic interface as Logic#execute().
Given below is an example usage scenario and how the buy transaction mechanism behaves at each step.
Step 1. The user launches the application. The UiManager will call on the MainWindow to invoke the UI which displays the clients.
Step 2. The user executes buy 1 q/10 g/Apple p/0.5 d/17/05/2000 command to add a buy transaction of 10 apples at $0.50 each on 17/05/2000 to the
client at index 1. This is done by calling the BuyCommand#execute() which will call Model#getFilteredClientList() to get the list of clients.
Step 3. List<Client>#get() is called to get the client at the index. The BuyTransaction is then added to the copied client by calling Client#addTransaction(Transaction).
The copied client is replaced with the client at the index by calling Model#setClient(Client, Client).
The following sequence diagrams shows how the buy operation works:
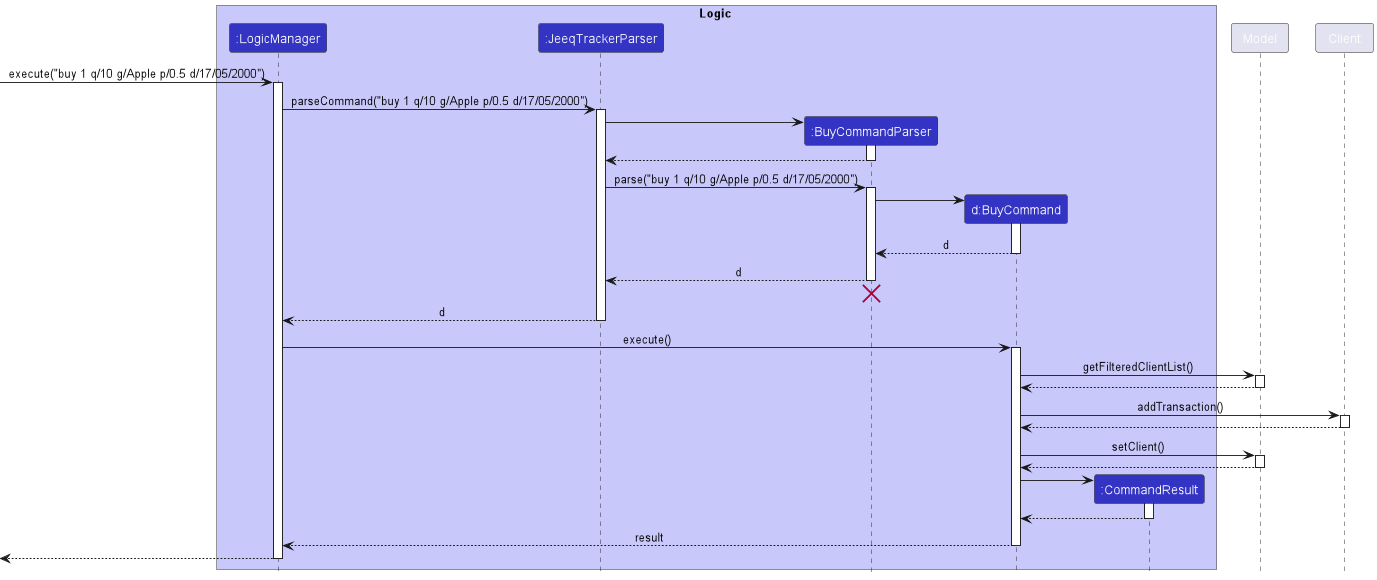
BuyCommand should end at the destroy marker (X) but due to a limitation of PlantUML, the lifeline reaches the end of diagram.
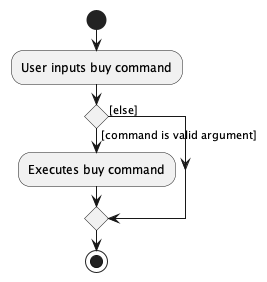
The following activity diagram summarizes what happens when a user executes the buy command:
Design considerations:
Aspect: How buy transaction executes:
-
Alternative 1 (current choice): Add buy transaction into each client.
- Pros: Easy to implement and allows the user to view all the buy transactions for each client via view command.
- Cons: Users cannot see all buy transaction of every client at one time.
-
Alternative 2: Add buy transaction to JeeqTracker instead of per client.
- Pros: Easy to see every past buy transaction with all the clients.
- Cons: Users may be overwhelmed if there are too many transactions. Also, users would be unable to tell which buy transaction belongs to which client.
Implementation for Sell Transaction
Similar to Buy Transaction.
{more aspects and alternatives to be added}
Editing client feature
Current Implementation
The edit client mechanism is facilitated by EditClientCommand which extends from EditCommand (which extends from Command) and
EditCommandParser which extends from Parser. To invoke the edit command, EditCommandParser will parse the arguments from user input with
EditCommandParser#parse() and returns the edit command if the arguments are valid.
EditTransactionCommand implements the EditClientCommand#execute() operation which executes the command and returns the result
message in a CommandResult object.
The operation is exposed in the Logic interface as Logic#execute().
Given below is the usage scenario and how the edit mechanism behaves at each step.
Step 1. The user launches the application. The UiManager will call on the MainWindow to invoke the UI which displays the clients.
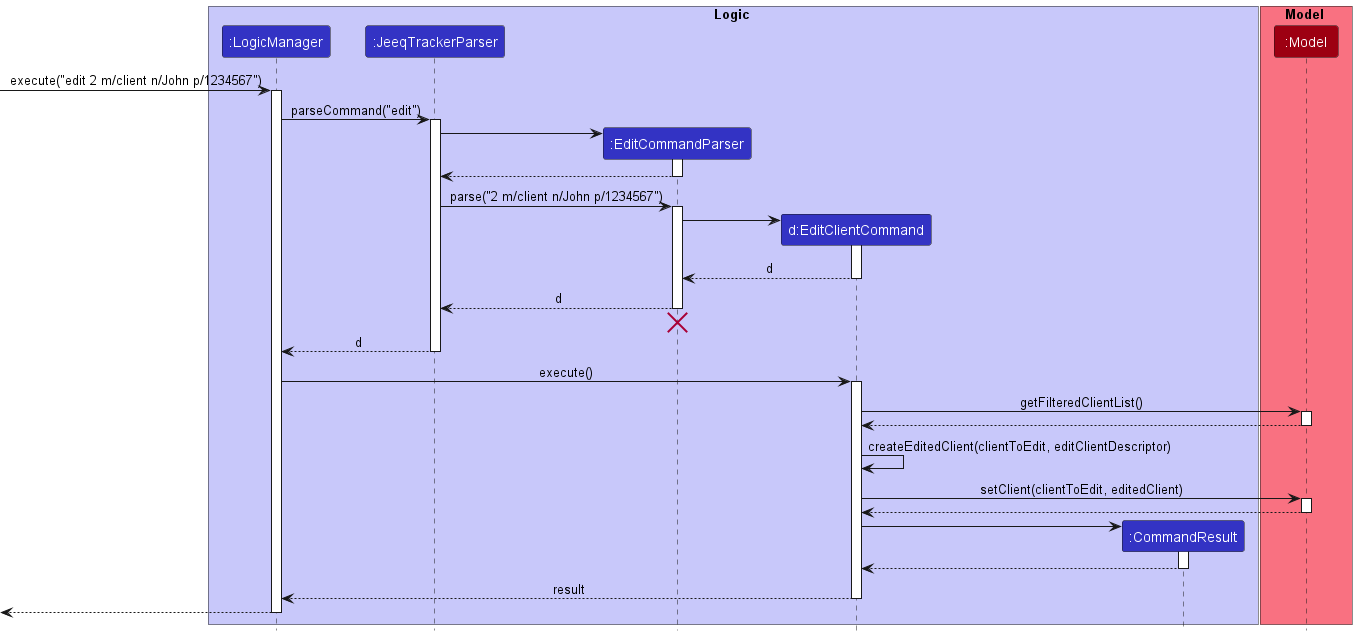
Step 2. The user executes edit 2 m/client n/John p/1234567 command to edit the information of the client at index 2 in the current Client list displayed on the left panel.
This is done by and executing Model#setClient(clientToEdit, editedClient)
The following sequence diagram shows how the edit client operation works in Logic Manager:
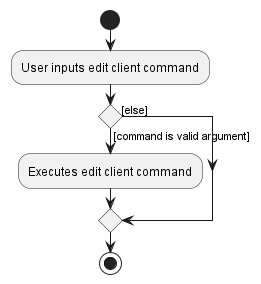
The following activity diagram summarizes what happens when a user executes the edit client command:
Design considerations:
Aspect: How edit Client executes:
-
Alternative 1 (current choice): Edit client by using model to update filtered client list.
- Pros: Easy to implement and allow the user to edit the client displayed on the left client lis panel.
- Cons: Users can only edit clients they can see in the current displayed list.
-
Alternative 2: Edit client using their index within a list of all clients in JeeqTracker.
- Pros: Be able to edit any client even if they are not displayed.
- Cons: Users will take a long time navigating through the list of all client to find the index of the client they want to edit.
Editing transactions feature
Current Implementation
The edit transaction mechanism is facilitated by EditTransactionCommand which extends from EditCommand (which extends from Command) and
EditCommandParser which extends from Parser. To invoke the edit command, EditCommandParser will parse the arguments from user input with
EditCommandParser#parse() and returns the edit command if the arguments are valid.
EditTransactionCommand implements the EditTransactionCommand#execute() operation which executes the command and returns the result
message in a CommandResult object.
The operation is exposed in the Logic interface as Logic#execute().
Given below is the usage scenario and how the edit mechanism behaves at each step.
Step 1. The user launches the application. The UiManager will call on the MainWindow to invoke the UI which displays the clients.
Step 2. The user executes view 1 command to focus on the client at index 1 and see the client’s list of transactions.
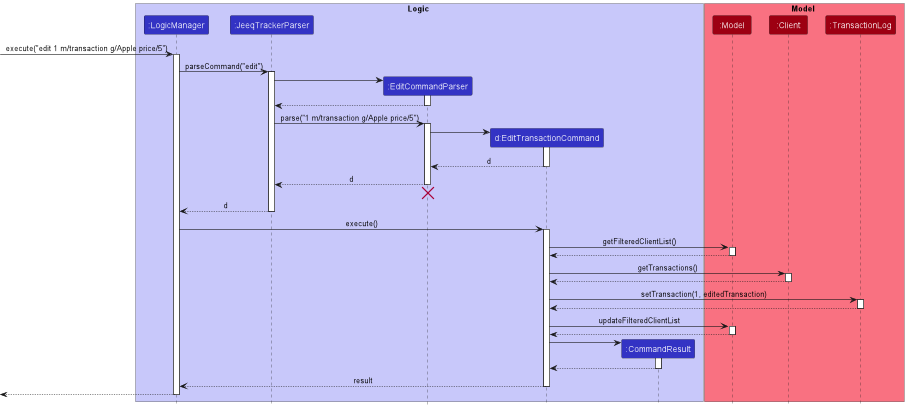
Step 3. The user executes edit 1 m/transaction g/Apple price/5 command to edit the name of goods and price of transaction at index 1 in the focused client’s transaction list.
This is done by accessing the TransactionLog of the focused client, and executing TransactionLog#setTransaction(index, editedTransaction)
The following sequence diagram shows how the edit transaction operation works in Logic Manager:
The following activity diagram summarizes what happens when a user executes the edit transaction command:
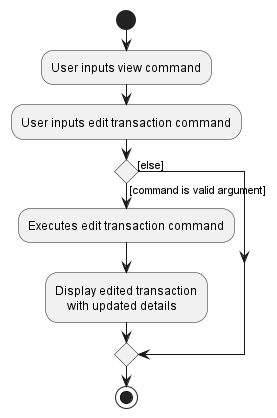
Design considerations:
Aspect: How edit transaction executes:
-
Alternative 1 (current choice): Edit transaction by accessing transaction log of each client.
- Pros: Easy to implement and allow the user to edit their transactions for each client seen in the Transactionlog.
- Cons: Users can only edit transactions of one client at a time.
-
Alternative 2: Edit transactions by using a common transaction log that keeps all transactions of all clients.
- Pros: Be able to edit any transaction without viewing a client.
- Cons: Users will take a long time navigating through the list of all transactions to edit.
Editing remarks feature
Current Implementation
The edit remark mechanism is facilitated by EditRemarkCommand which extends from EditCommand (which extends from Command) and
EditCommandParser which extends from Parser. To invoke the edit command, EditCommandParser will parse the arguments from user input with
EditCommandParser#parse() and returns the edit command if the arguments are valid.
EditRemarkCommand implements the EditRemarkCommand#execute() operation which executes the command and returns the result
message in a CommandResult object.
The operation is exposed in the Logic interface as Logic#execute().
Given below is the usage scenario and how the edit mechanism behaves at each step.
Step 1. The user launches the application. The UiManager will call on the MainWindow to invoke the UI which displays the clients.
Step 2. The user executes view 1 command to focus on the client at index 1 and see the client’s list of remarks.
Step 3. The user executes edit 2 m/remark Fast and responsive command to replace the remark at index 2 in the focused client’s remarks list.
This is done by accessing the UniqueRemarkList of the focused client, and executing UniqueRemarkList#replaceRemark(index, editedTransaction)
The following sequence diagram shows how the edit remark operation works in Logic Manager:
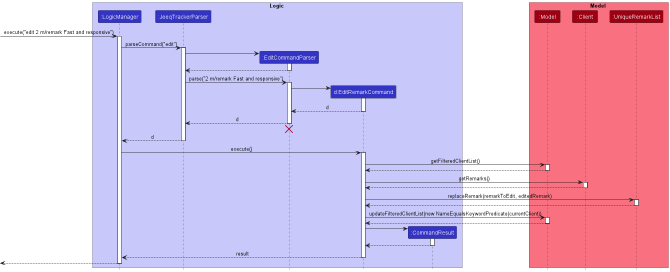
The activity diagram for this feature is the same as that of the Editing transaction feature
Design considerations:
Aspect: How edit remark executes:
- The design consideration for editing remark is similar to that of the editing transaction feature
Delete Client/Transaction/Remark feature
This feature allows the user to delete a specific client, transaction, or remark of their choice.
Deletion removes the whole entity, and none of its fields are kept.
Implementation details
The deletion mechanism for clients, transactions, and remarks is facilitated by a DeleteCommandParser and DeleteCommand.
The DeleteClientCommand, DeleteTransactionCommand, DeleteRemarkCommand extends the DeleteCommand abstract class. These classes contains the logic to delete an entity stated by the name of their command, as depicted by the class diagram below.
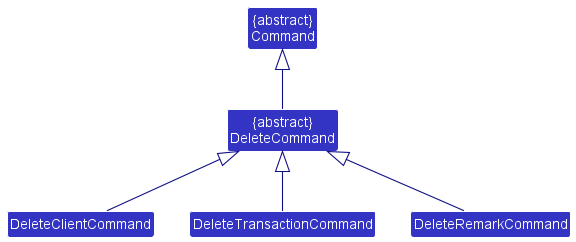
The deletion process occurs in these 3 main steps:
1) The DeleteCommandParser will parse the userInput, and return one of the concrete class DeleteClientCommand, DeleteTransactionCommand, or DeleteRemarkCommand.
2) The Command received in step 1 will be executed to delete the entity of its type, and return a CommandResult
3) The CommandResult contains the message to print to the Application's Reply
The sequence diagram below shows how a client is deleted for user input delete 1 m/client.

DeleteCommandParser should end at the destroy marker (X) but due to a limitation of PlantUML, the lifeline reaches the end of diagram.
The process of deleting a transaction is almost the same as the process stated above, with a main difference in how the DeleteTransactionCommand and Model interact as shown in the sequence diagram below.
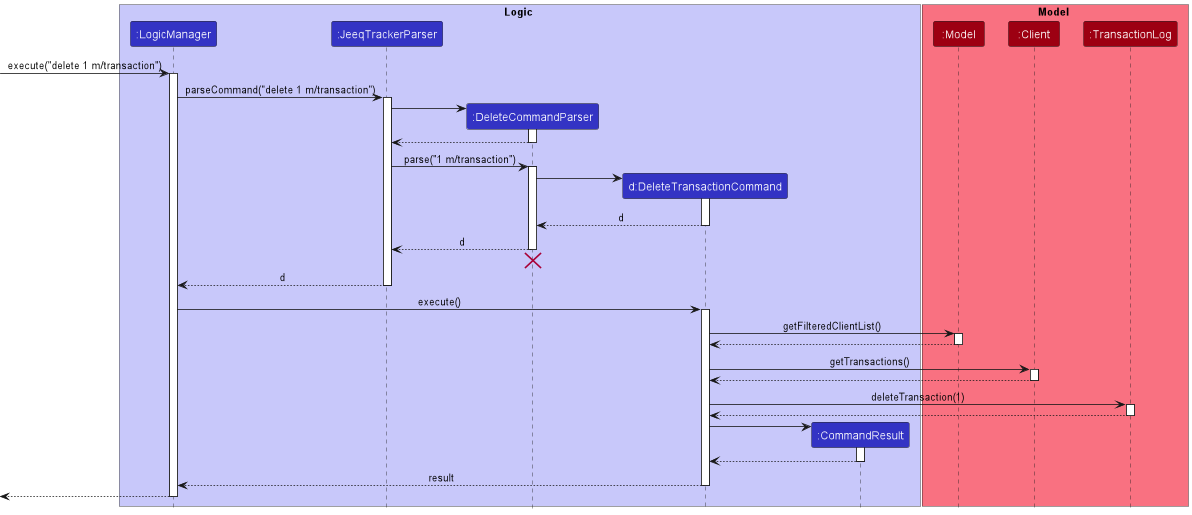
The process for deleting a remark is the same as the process of deleting a transaction, except for the following differences:
-
userInputis changed todelete 1 m/remark -
parse("1 m/remark")returnsd, which is aDeleteRemarkCommandinstead of aDeleteTransactionCommand -
deleteTransaction(1)is changed todeleteRemark(1)
Design Considerations:
Aspect: How delete executes:
-
Alternative 1 (current choice): Delete either Client/Transaction/Remark specified by
mode (m) flagafter the index.- Pros: Easy to implement and lesser commands overall since flag is used to specify each command.
- Cons: May be more clunky to use as users have to type in a longer command.
-
Alternative 2: Create separate individual commands to Delete Client/Transaction/Remark, e.g.
deleteClient 1,deleteTransaction 1,deleteRemark 1.- Pros: More intuitive to use, shorter command to type.
- Cons: Adds more valid commands that the user can use, which may not be very user-friendly since they have to remember more commands. Also, there will be much more classes and code.
Sort feature
Current Implementation
The sort mechanism for transactions is facilitated by a SortCommandParser and SortCommand.
The SortCommandParser will take in the userInput, parse it, and return the correct concrete command type that is SortCommand which will be executed to achieve the sort functionality.
The operation is exposed in the logic interface as Logic#execute().
Given below is an example usage scenario and how the sort transaction mechanism behaves at each step.
Step 1. The user launches the application. The UiManager will call on the MainWindow to invoke the UI which displays the clients.
Step 2. The user executes sort 1 latest command to sort the transaction of the client at index 1 by the latest transactions first.
Step 3. The Execute of SortCommand will call Model#getFilteredClientList() to get the list of clients. List<Client>#get() is called to
get the client at the index to copy. The copied client is replaced with the client at the index by calling Model#setClient(Client, Client).
Step 4. The CommandResult of FilterTransCommand will call MainWindow#handleSortTransaction(),
to display the sorted transactions from the Client#getSortLatestTransaction() while the client panel list will display the clients.
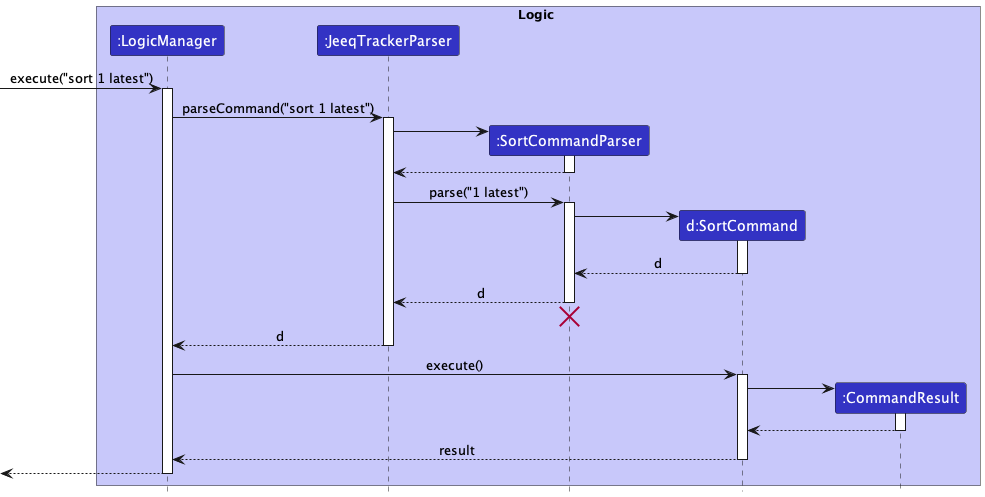
SortCommand should end at the destroy marker (X) but due to a limitation of PlantUML, the lifeline reaches the end of diagram.
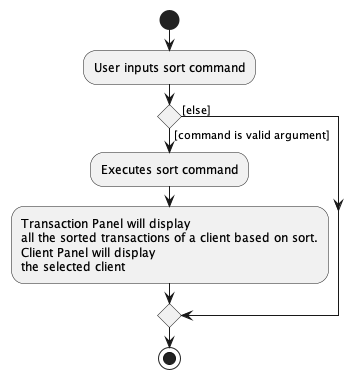
The following activity diagram summarizes what happens when a user executes a sort command:
Design Considerations:
Aspect: How Sort executes:
-
Alternative 1 (current choice): Sort Transaction specified by
oldestorlatestselected byindex- Pros: Easy to implement and easy to understand command. Also targeted sort command allows for unnecessary transactions to be hidden, increasing user-friendliness.
- Cons: Users may want to sort and view all transactions by
oldestorlatest.
-
Alternative 2: Sort all Transaction of all clients by
oldestorlatest.- Pros: Allows for faster sorting for users if user wants to sort every client.
- Cons: It is rare for users to want to sort all clients by
oldeestorlatest. Also, there maybe information overload if all transactions are displayed when sorted.
{more aspects and alternatives to be added}
Documentation, logging, testing, configuration, dev-ops
Appendix: Requirements
Product scope
Target user profile:
This product is for home-based business owners / reseller who need help in keeping track of clients’ contacts, transaction records, and remarks about the client.
JeeqTracker is designed specifically for people with these characteristics:
- needs to get things done extremely fast
- prefer desktop applications over other types
- can type fast
- prefers typing to mouse interactions
- is reasonably comfortable using Command Line Interface (CLI) applications
Value proposition:
With JeeqTracker, users can analyze and understand the demands of each client and provide a more personalized service that will meet the needs of the users’ clients, increasing customer engagement. Furthermore, users can keep track of clients, transactions and remarks of a client much faster than traditional applications.
User stories
Priorities: High (must have) - * * *, Medium (nice to have) - * *, Low (unlikely to have) - *
| Priority | As a … | I can … | So that I can… |
|---|---|---|---|
* * * |
home-based business owner | add a client with his name, phone, email and address | keep track of clients who I will have transactions with |
* * * |
home-based business owner | add a buy / sell transaction with a specific client | keep track of transactions with a particular client |
* * * |
home-based business owner | add a remark to a specific client | record down things about the client to help me know more about the client in the future |
* * * |
home-based business owner | view a client’s details (name, phone, email, address, remarks) | easily know who and how to contact him |
* * * |
home-based business owner | view all transactions (Goods name, price, quantity, date transacted) with a client | analyse my business |
* * * |
home-based business owner | view all remarks of a specific client | know more about the client |
* * * |
home-based business owner | delete any client, transaction, or remark of my choice | remove anything that is added wrongly, or incorrect |
* * * |
careless home-based business owner | edit the details of any client, transaction or remark of my choice | correct any erroneous fields that I have added |
* * * |
calculative home-based business owner | see my overall profits with a particular client or all clients | I can analyse how to earn more profits |
* * |
forgetful home-based business owner | access a built-in help functionality that tells me what commands are valid, and how to use them | have assistance within the application without opening the user guide in another browser |
* * |
efficient home-based business owner | sort the transactions of a specific client by date | easily tell which are my latest or oldest transaction |
* * |
home-based business owner | filter all transactions by buy or sell
|
see all my transactions that are of type buy or sell at one glance |
* * |
busy home-based business owner | do a simple and quick retrieval of clients by finding them by name | save time |
* * |
forgetful home-based business owner | open an instructions sheet (user guide) within the application | learn more about different commands with pictorial assistance |
* |
calculative home-based business owner | upload invoices for transactions | retrieve a proof of transaction when required |
* |
artistic home-based business owner | have some form of control over the colour of the program | customise the application to my liking |
* |
forgetful home-based business owner | upload profile photos for my clients | I can recognise them easily |
{More to be added}
Use cases
(For all use cases below, the System is the JeeqTracker and the Actor is the user, unless specified otherwise)
The use case diagram below showcases the tasks that the user can perform in JeeqTracker
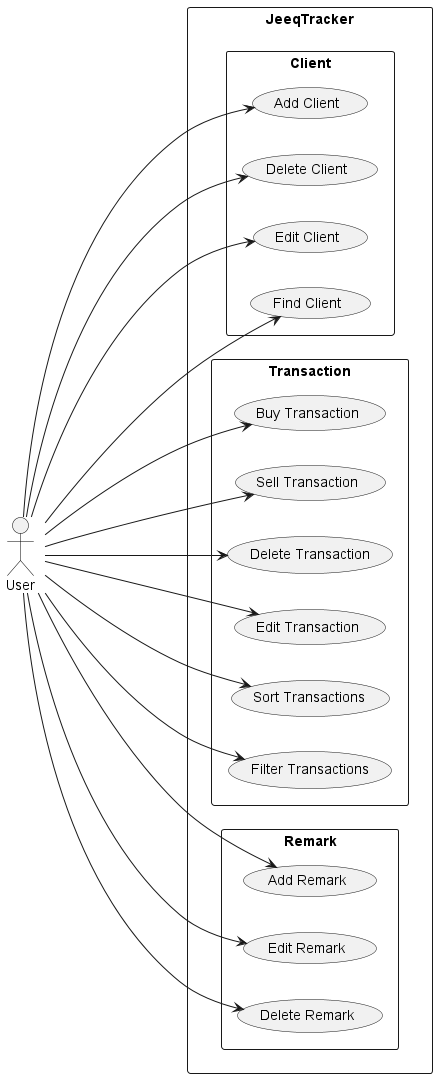
Users are able to perform several tasks within the application that is broken down into Client tasks, Transaction tasks, and Remark tasks. For a more detailed interaction between user and the system, read the use case descriptions below.
Use case: UC01 - Delete a client
MSS
- User requests to list all clients
- JeeqTracker shows a list of clients
- User requests to delete a specific client in the list
-
JeeqTracker deletes the client
Use case ends.
Extensions
-
2a. The list is empty.
Use case ends.
-
3a. The given client does not exist in the list.
-
3a1. JeeqTracker shows an error message.
Use case resumes at step 2.
-
Use case: UC02 - Delete a transaction
MSS
- User requests to view transaction details with a client
- JeeqTracker shows a list of transactions that the user has with that client
- User requests to delete a specific transaction in the transaction list
-
JeeqTracker deletes the transaction
Use case ends.
Extensions
-
2a. The transaction list is empty
Use case ends.
-
3a. The transaction does not exist in the list
Use case resumes at step 2.
Use case: UC03 - Delete a remark
- User requests to view remark details of a client
- JeeqTracker displays a list of remarks of that client
- User requests to delete a specific remark in the remark list
-
JeeqTracker deletes the remark
Use case ends.
Extensions
-
2a. The remark list is empty
Use case ends
-
The remark does not exist in the list
Use case resumes at step 2.
Use case: UC04 - Find a Client
MSS
- User requests to find a client
-
JeeqTracker displays the clients with the same starting names
Use case ends.
Extensions
-
2a. There are no clients with that name.
Use case ends.
Use case: UC05 - Add a Remark to a Client
Preconditions: Alice is a valid Client in JeeqTracker
MSS
- User requests to list all clients
- JeeqTracker shows a list of clients
- User requests to add Punctual Buyer as a Remark to client Alice
-
JeeqTracker adds Punctual Buyer as the Remark to Alice’s contact card
Use case ends.
Extensions
- 3a. User fails to provide a valid command format to create a Remark.
-
3a1. JeeqTracker shows an error message.
Use case resumes at 2.
-
Use case: UC06 - Requesting help
MSS
- User requests for help to use the add function
- JeeqTracker displays a detailed explanation on how to use the add function
- User requests for all the functionalities
-
JeeqTracker displays a pop-up with the link to the user guide
Use case ends.
Use case: UC07 - Clearing all data
MSS
- User requests to clear all data in JeeqTracker
-
JeeqTracker clears all data in JeeqTracker (All
clients,transactions,remarksare deleted)Use case ends.
Use case: UC08 - Buying from a client
Preconditions: Alice is a valid Client in JeeqTracker
MSS
- User requests to list clients
- JeeqTracker shows a list of clients
- User requests to add a buy transaction to a specific client in the list
-
JeeqTracker adds the buy transaction to the client
Use case ends.
Extensions
-
2a. The list is empty.
Use case ends.
-
3a. The given client does not exist in the list.
-
3a1. JeeqTracker shows an error message.
Use case resumes at step 2.
-
-
3b. User fails to provide a valid command format to create a Buy Transaction.
-
3b1. JeeqTracker shows an error message.
Use case resumes at step 2.
-
Use case: UC09 - Selling to a client
Preconditions: Alice is a valid Client in JeeqTracker
- Similar to UC08. Just changing Buy to Sell.
Use case: UC10 - Sort client by latest transaction
Preconditions: JeeqTracker has at least 1 client
MSS
- User requests to sort the client at index 1 by latest transactions
-
JeeqTracker displays the list of transactions of client at index 1 sorted by the latest dates first.
Use case ends.
Use case: UC11 - Edit a client
Preconditions: Alice is a valid Client in JeeqTracker
MSS
- User requests to list all clients
- JeeqTracker shows a list of clients
- User requests to edit a specific client in the list
-
JeeqTracker edits the client
Use case ends.
Extensions
-
3a. The given client does not exist in the list.
-
3a1. JeeqTracker shows an error message.
Use case resumes at step 2.
-
-
3b. User fails to provide a valid command format to edit a client.
-
3b1. JeeqTracker shows an error message.
Use case resumes at 2.
-
Use case: UC12 - Edit a transaction
Preconditions: Alice is a valid Client with at least one transaction in JeeqTracker
MSS
- User requests to view transaction details of a client
- JeeqTracker displays a list of transactions of that client
- User requests to edit a specific transaction in the transaction list
-
JeeqTracker edits the transaction
Use case ends.
Extensions
-
2a. The list is empty.
Use case ends.
-
3a. The given client does not exist in the list.
-
3a1. JeeqTracker shows an error message.
Use case resumes at step 2.
-
-
3b. User fails to provide a valid command format to edit a client.
-
3b1. JeeqTracker shows an error message.
Use case resumes at 2.
-
Use case: UC13 - Edit a remark
Preconditions: Alice is a valid Client with at least one remark in JeeqTracker
This use case exactly similar to use case UC12. Instead of transaction, remark will be used for this use case
Non-Functional Requirements
- Should work on any mainstream OS as long as it has Java
11. - Should be able to hold up to 1000 clients, transactions, and remarks without a noticeable sluggishness in performance for typical usage.
- A user with above average typing speed for regular English text (i.e. not code, not system admin commands) should be able to accomplish most of the tasks faster using commands than using the mouse.
- The User Interface should be fully rendered within 2 seconds of launching the application.
- The system should be usable by a business owner who has basic knowledge of how to use a computer.
- The user is not required to handle the saving of clients, transactions and remarks.
- JeeqTracker is offered as a free tool.
- The source code should be open source.
{More to be added}
Glossary
| Terms | Definition |
|---|---|
| Mainstream OS | Windows, Linux, Unix, OS-X |
| Client | People who the user wants to have transactions with, or have already transacted with the user |
| Remark | Characteristics of a client (e.g. Punctual, Friendly) |
| Transaction | can only be a buy or sell transaction, not a trade |
Appendix: Instructions for manual testing
Given below are instructions to test the app manually.
Launch and shutdown
-
Initial launch
-
Download the jar file and copy into an empty folder
-
Double-click the jar file
Expected: Shows the GUI with a set of sample clients. The window size may not be optimum.
-
-
Saving window preferences
-
Resize the window to an optimum size. Move the window to a different location. Close the window.
-
Re-launch the app by double-clicking the jar file.
Expected: The most recent window size and location is retained.
-
Viewing a client
-
Viewing a client while all clients are shown.
-
Prerequisites: List all clients using the
listcommand. Multiple clients in the list. - Test case:
view 1
Expected: The list of clients panel is filtered to left only the first client in the original list. All transactions and remarks with first client is shown in the transaction list panel and remark list panel respectively. - Test case:
view 0
Expected: List of clients panel is not filtered. Transactions panel and Remarks panel is not updated. Error details is shown in theApplication's Replypanel. - Other incorrect view commands to try:
view abc,view x(where x is larger than the client list size displayed)
Expected: Similar to previous.
-
Deleting a client
-
Deleting a client while all clients are being shown.
-
Prerequisites: List all clients using the
listcommand. Multiple clients in the list. -
Test case:
delete 1 m/client
Expected: First client is deleted from the list. Details of the deleted client (excluding remarks) shown in theApplication's Replypanel. -
Test case:
delete 0 m/client
Expected: No client is deleted. Error details shown in theApplication's Replypanel. -
Other incorrect delete commands to try:
delete,delete x m/client(where x is larger than the displayed client list size),delete 1
Expected: Similar to previous.
-
Deleting a transaction
-
Deleting a transaction while only one client is shown in the client list.
- Prerequisites: View a single client using the
viewcommand. Useview 1(must have at least one client in the list). Multiple transactions in the transaction list panel. - Test case:
delete 1 m/transaction
Expected: First transaction is deleted from the list. Details of the deleted transaction shown in theApplication's Replypanel. - Test case:
delete 0 m/transaction
Expected: No transaction is deleted. Error details shown in theApplication's Replypanel. - Other incorrect delete commands to try:
delete,delete x m/transaction(where x is larger than the transaction list size displayed),delete 1
Expected: Similar to previous.
- Prerequisites: View a single client using the
-
Deleting a transaction while more than one client is shown in the client list.
- Prerequisites: List all clients using the
listcommand. More than one client in the list. - Test case:
delete 1 m/transaction
Expected: No transaction is deleted. Error details shown in theApplication's Replypanel.
- Prerequisites: List all clients using the
Deleting a remark
- Note: This test is exactly the same as Deleting a transaction, except replace all
transactionkeyword withremark.
Filtering transactions from all clients
-
Filtering transactions.
- Test case:
filter buy
Expected: All buy transactions will be displayed in the transaction list panel while all clients will be listed in the client list panel. If there are no buy transactions, the transaction list panel will be empty. - Test case:
filter sold
Expected: No transaction is filtered. Error details shown in theApplication's Replypanel. - Other incorrect filter commands to try:
filter,filter all,filter 1
Expected: Similar to previous.
- Test case:
Editing a client
-
Editing a client in the client list.
- Test case:
edit 1 m/client n/JohnDoe
Expected: First client’s name is changed to JohnDoe. Details of the edited client shown in theApplication's Replypanel. - Test case:
edit 0 m/client
Expected: No client is edited. Error details shown in theApplication's Replypanel. - Other incorrect edit client commands to try:
edit,edit x m/client(where x is larger than the transaction list size displayed),edit 1 m/client n/,delete 1
Expected: Similar to previous.
- Test case:
Editing a transaction
-
Editing a transaction while only one client is shown in the client list.
- Prerequisites: View a single client using the
viewcommand. Useview 1(must have at least one client in the list). Multiple transactions in the transaction list panel. - Test case:
edit 1 m/transaction g/Oranges q/100
Expected: First transaction goods name and quantity is edited in the list. Details of the edited transaction shown in theApplication's Replypanel. - Test case:
edit 0 m/transaction
Expected: No transaction is edited. Error details shown in theApplication's Replypanel. - Other incorrect edit transaction commands to try:
edit,edit x m/transaction(where x is larger than the transaction list size displayed),edit 1 m/transaction q/12g/edit 1`
Expected: Similar to previous.
- Prerequisites: View a single client using the
-
Editing a transaction while more than one client is shown in the client list.
- Prerequisites: List all clients using the
listcommand. More than one client in the list. - Test case:
edit 1 m/transaction g/Apples
Expected: No transaction is edited. Error details shown in theApplication's Replypanel.
- Prerequisites: List all clients using the
Editing a remark
-
Editing a remark while only one client is shown in the client list.
- Prerequisites: View a single client using the
viewcommand. Useview 1(must have at least one client in the list). One or multiple remarks in the transaction list panel. - Test case:
edit 1 m/remark new Edited Remark
Expected: First remark is edited in the list to benew Edited Remark. Details of the edited remark shown in theApplication's Replypanel. - Test case:
edit 0 m/remark
Expected: No remark is edited. Error details shown in theApplication's Replypanel. - Other incorrect edit remark commands to try:
edit,edit x m/remark(where x is larger than the transaction list size displayed)
Expected: Similar to previous.
- Prerequisites: View a single client using the
-
Editing a remark while more than one client is shown in the client list.
- Prerequisites: List all clients using the
listcommand. More than one client in the list. - Test case:
edit 1 m/remark newRemark
Expected: No remark is edited. Error details shown in theApplication's Replypanel.
- Prerequisites: List all clients using the
Sorting transactions of a client
-
Sorting transactions.
- Prerequisites: At least one client in the list.
- Test case:
sort 1 latest
Expected: All transactions in index 1 client will be displayed in the transaction list panel, sorted with the latest transactions first. If there are no transactions, the transaction list panel will be empty. - Test case:
sort 2 newest
Expected: No transactions for index 2 client is sorted. Error details shown in theApplication's Replypanel. - Other incorrect sort commands to try:
sort all latest,sort me,sort newest
Expected: Similar to previous.
Adding buy/sell transactions
-
Adding a transaction while only one client is shown in the client list.
- Test case:
buy 1 g/apples price/0.50 q/100
Expected: Details of the added transaction is shown in the Transactions Window. - Test case:
sell 0 g/apples price/0.50 q/100
Expected: No transaction is added. Error details shown in theApplication's Replypanel. - Other incorrect buy/sell commands to try:
buy,sell 3,buy g/apples price/0.5 q/abc
Expected: Similar to previous.
- Test case:
-
Adding a transaction while more than one client is shown in the client list.
- Prerequisites: List all clients using the
listcommand. More than one client in the list. - Test case:
buy 1 g/apples price/test q/100
Expected: No transaction is added. Error details shown in the Application’s Reply panel.
- Prerequisites: List all clients using the
Help Command
-
Executing the Help Command.
- Test case:
help
Expected: Display all the valid commands’ usage message. - Test case:
help buy
Expected: Display help command’s usage message. - Test case:
help me please
Expected: Not a valid command. Error details shown in theApplication's Replypanel. - Other incorrect help commands to try:
help add buy,help 3,help elgin
Expected: Similar to previous.
- Test case:
Saving data
-
Dealing with missing/corrupted data file
- Delete the
jeeqtracker.jsonfile to simulate missing data file. Launch the application
Expected: A newjeeqtracker.jsonfile is created with sample some sample data.
- Delete the
-
Dealing with invalid data in data file
- Open the
jeeqtracker.jsonfile. Change one field to an invalid data, e.g. change thepricefield to contain value123abc. Launch the application
Expected: Application starts up with no data.
- Open the
{ more test cases … }
Appendix: Effort
Every member in our group agrees that we have put in a lot more effort personally compared to the individual project (IP). We faced tremendous difficulties when we were dealing with transactions and remarks. On hindsight, it may seem as simple as coding while referencing how AB3 handle the logic and rendering of Person. However, it was a lot more challenging than it seem, because the transactions and remarks are unique to every client. Thus, it took a lot of time and effort for us to have an idea of how we should render transactions and remarks on the screen, and how the different commands such as delete, edit can be evolved to handle them. The lack of references in AB3 made it a lot harder since the Person class in AB3 does not have a List attribute, and we have to add it.
Furthermore, we felt like we had created two additional AB3 in total, twice the effort of what it takes to create AB3. The transactions and remarks each are almost like an AB3. They have their own storage, user interface, model, and have its own CRUD (Create, Read, Update, Delete) functionality. We also had to spend a lot of time learning about JavaFX, Jackson, since none of us has any experience with these prior to CS2103T. It definitely took more time and effort to create the user interface that we have now compared to the one in IP, since it was basically hand-holding in IP.
We also have to refactor the application once at around week 10, because we realised that there wasn’t a real value proposition for our application. Hence, thousands of lines were refactored at that period, and it took much effort to get used to the new terms within the code.
We have spent a lot of effort in creating the UserGuide, adding almost up to triple the length of the original AB3, adding new sections that AB3 doesn’t have, and more user-friendly screenshots of the application with annotations.
For Developer Guide, we had to change almost every single diagram within the application to align to our current code, and add more explanations to it. When appropriate, we also included new diagrams which were relevant, and created many more user stories, use cases, Non-Functional Requirements, Glossary, and Instructions for manual testing. It is definitely much more than the original developer guide.
Overall, our team has spent a lot more effort in our application, user guide, developer guide than the original AB3.